ラベル Erlang の投稿を表示しています。 すべての投稿を表示

1.05.2014

Getting Started with Erlang pt.6

Erlang をはじめよう その6


前回 - mog project: Getting Started with Erlang pt.5 の続き

CHAPTER 11: Getting Started with OTP

いよいよ OTP の章に入る。

OTPとは Open Telecom Platform の略。
分散並列処理のためのライブラリ群と耐障害性の高いアプリケーションサーバ機能を持った
フレームワークの名称である。

Open Telecom Platform - Wikipedia, the free encyclopedia

この OTP の機能を活用することこそ、Erlang を使う最大の目的である。


モジュールをサービスとして実行する

-define はマクロの定義、?MODULE は組み込みマクロ。

-module(shop).
-behaviour(gen_server).
-export([start_link/0]). % convenience call for startup
-export([init/1,
         handle_call/3,
         handle_cast/2,
         handle_info/2,
         terminate/2,
         code_change/3]). % gen_server calls
-define(SERVER, ?MODULE). % macro that just defines this module as server
-record(state, {count}). % simple counter state

%%% convenience method for startup
start_link() ->
        gen_server:start_link({local, ?SERVER}, ?MODULE, [], []).

%%% gen_server callbacks
init([]) ->
        {ok, #state{count=0}}.

handle_call(_Request, _From, State) ->
        Distance = _Request,
        Reply = {ok, buy(Distance)},
        NewState=#state{ count = State#state.count+1 },
        {reply, Reply, NewState}.

handle_cast(_Msg, State) ->
        io:format("So far, calculated ~w prices.~n", [State#state.count]),
        {noreply, State}.

handle_info(_Info, State) ->
        {noreply, State}.

terminate(_Reason, _State) ->
        ok.

code_change(_OldVsn, State, _Extra) ->
        {ok, State}.

%%% Internal functions

buy(Number) -> 100 * Number.

実行

> c(shop)
> shop:start_link().
> gen_server:call(shop, 3).
> gen_server:call(shop, 5).
> gen_server:cast(shop, {}).
> gen_server:call(shop, 7).
> gen_server:cast(shop, {}).

サーバ実行中にモジュールを書き換えることもできる。
例えば、shop.erl の最終行を以下のように書き換える。

buy(Number) -> 105 * Number.

先ほどのコンソールで引き続き。

> c(shop).
> gen_server:call(shop, 7).
> gen_server:cast(shop, {}).

ただし、処理中にエラーが発生するとサーバは停止してしまう。

> gen_server:call(shop, apple).
> gen_server:call(shop, 7).


スーパーバイザーの実行
-module(shop_sup).
-behaviour(supervisor).
-export([start_link/0]). % convenience call for startup
-export([init/1]). % supervisor calls
-define(SERVER, ?MODULE). % macro that just defines this module as server


%%% convenience method for startup
start_link() ->
        supervisor:start_link({local, ?SERVER}, ?MODULE, []).

%%% supervisor callback
init([]) ->
        RestartStrategy = one_for_one,
        MaxRestarts = 1, % one restart every
        MaxSecondsBetweenRestarts = 5, % five seconds

        SupFlags = {RestartStrategy, MaxRestarts, MaxSecondsBetweenRestarts},

        Restart = permanent, % or temporary, or transient
        Shutdown = 2000, % milliseconds, could be infinity or brutal_kill
        Type = worker, % could also be supervisor

        Shop = {shop, {shop, start_link, []},
                          Restart, Shutdown, Type, [shop]},

        {ok, {SupFlags, [Shop]}}.


%%% Internal functions (none here)

実行

> c(shop_sup).
> {ok, Pid} = shop_sup:start_link().
> unlink(Pid).
> gen_server:call(shop, 3).
> whereis(shop).
> gen_server:call(shop, apple).    % error
> whereis(shop).
> gen_server:call(shop, 5).

start_link を行うとシェル自身がスーパーバイザーになってしまうので、
サーバを起動し続けるためには unlink を行う必要がある。

別の方法としては、gen_server:call の呼び出しを catch で囲むアプローチもある。


アプリケーションとしてパッケージングする

アプリケーション リソースファイル

{application,shop,
[{description,"Shopping some fruits"},
{vsn,"0.0.1"},
{modules,[shop, shop_sup]},
{applications,[kernel,stdlib]},
{mod,{shop_app,[]}}]}.

アプリケーション モジュール

-module(shop_app).
-behaviour(application).
-export([start/2, stop/1]).

start(_Type, _StartArgs) ->
  shop_sup:start_link().

stop(_State) ->
  ok.

実行

> c(shop_app).
> application:load(shop).
> application:loaded_applications().
> application:start(shop, 3).
> application:start(shop).
> gen_server:call(shop, 3).
> whereis(shop).
> gen_server:call(shop, apple).
> whereis(shop).
> gen_server:call(shop, 5).

カレントディレクトリ以外の場所にリソースがある場合には
code:add_path("path/to/the/directory").
が必要。


CHAPTER 12: Next Steps Through Erlang

最終章。次のステップは?


References


Related Posts

1.04.2014

Getting Started with Erlang pt.5

Erlang をはじめよう その5


前回 - mog project: Getting Started with Erlang pt.4 の続き

CHAPTER 9: Exceptions, Errors, and Debugging


try .. catch の基本形
> try math:sqrt(-1) of
>   Result -> Result
> catch
>   error: Error -> {error, Error}
> end.
> try math:sqrt(2)
> catch
>   error: Error -> {error, Error}
> end.  % ok
> try math:sqrt(-2)
> catch
>   error: Error -> {error, Error}
> end.
> try
>   X = -2,
>   math:sqrt(X)
> of
>   Result -> Result
> catch
>   error: Error -> {error, Error}
> end.


after 節の指定
> F = fun(X) -> try math:sqrt(X)
> catch
>   error: Error -> {error, Error}
> after
>   io:format("AFTER CODE~n")
> end
> end.
> F(2).
> F(-2).


例外の送出

エラーと例外を区別することができる。

> throw(my_exception).
> try throw(my_exception)
> catch
>   error: Error -> {found, Error};
>   throw: Exception -> {caught, Exception}
> end.


メッセージのロギング
> error_logger:info_msg("information~n").
> error_logger:warning_msg("warning~n").
> error_logger:error_msg("error~n").
> error_logger:info_msg("~p~n", []).
> error_logger:info_report("~p~n", []).    % フォーマットエラーの場合の挙動が異なる


ログファイルへの書き込み

カレントディレクトリ配下に test.log というファイルを作成。

> error_logger:logfile({open, "test.log"}).
> error_logger:info_msg("information").
> error_logger:logfile(close).


GUI でのデバッグ

debug_info オプションを付けてコンパイルする必要がある。

> c(shop, [debug_info]).
> debugger:start().
  • [GUI操作] Module -> Interrupt... -> デバッグ対象のモジュールを Choose
> Pid1 = spawn(async_shop,async_shop,[]).
  • [GUI操作] Break -> Line Break でブレイクポイントを設置。
> Pid1 ! {apple, 3}.

ステップ実行や、変数の値を確認できた。


コンソールでのデバッグ
  • 送受信メッセージのトレース
    > dbg:tracer().
    > Pid1 = spawn(async_shop,async_shop,[]).
    > dbg:p(Pid1,m).
    > Pid1 ! {apple, 3}.
  • 関数呼び出しのトレース
    -module(fact).
    -export([factorial/1]).
    
    factorial(N) -> factorial(1, N, 1).
    
    factorial(Current, N, Result) when Current =< N -> factorial(Current + 1, N, Result * Current);
    factorial(Current, N, Result) -> Result.
    > c(fact).
    > dbg:tracer().
    > dbg:p(all, c).
    > dbg:tpl(fact, factorial, []).
    > fact:factorial(4).


CHAPTER10: Storing Structured Data


レコード

レコードとは、固定長のデータ構造であり、名前でアクセスすることができるフィールドからなる。
Cの構造体のようなもの。

Erlang におけるレコードはコンパイル時の機能であって、VMに固有の型があるわけではない。

  • レコードの基本操作

    複数のモジュールで共有できるように、レコード定義は個別のファイル(拡張子hrl)に記述するのがよいらしい。

    -record(person, {name, age=20, phone}).
    
    > rr("records.hrl").
    > Person1=#person{}.
    > Person2=#person{name="Alice", age=16}.
    > Person3=#person{name="Bob", phone="123-4567", age=35}.
    > #person{phone=P, name=N} = Person3.
    > {P, N}.
    > Person3 = Person3#person{name="Charlie"}.    % error
    > Person4 = Person3#person{name="Charlie"}.
    > rf().
    > #person{}.
    > Person1.
  • モジュール内でレコードを利用する
    -module(person).
    -export([rename/2]).
    -include("records.hrl").
    
    rename(#person{name=Name} = Person, NewName) ->
      io:format("Changed name: ~s -> ~s~n", [Name, NewName]),
      Person#person{name=NewName}.
    > c(person).
    > rr("records.hrl").
    > P = #person{name="Alice", age=16, phone="123-4567"}.
    > person:rename(P, "Bob").


Erlang Term Storage (ETS)

Erlang 付属の KVS (key/value store)。

  • テーブルの作成
    -module(users).
    -export([setup/0]).
    -include("records.hrl").
    
    setup() ->
      Table = ets:new(users, [named_table, {keypos, #person.name}]),
      ets:insert(users, #person{ name="Alice", age=16, phone="123-4567"}),
      ets:insert(users, #person{ name="Bob", age=35, phone="000-0000"}),
      ets:insert(users, #person{ name="Charlie", age=66, phone="111-1111"}),
      ets:info(Table).
    > c(users).
    > users:setup().    % size を確認
    > rr("records.hrl").
    > ets:tab2list(users).
    > tv:start().    % GUI が起動
    > ets:i().

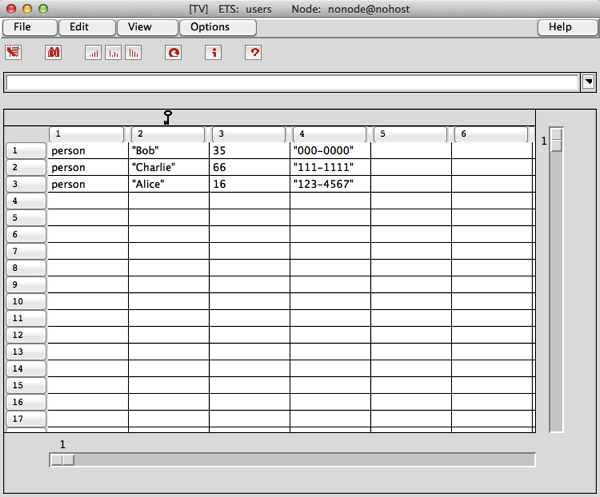
    このような GUI でレコードの内容を確認できる。

    TV ETS users Node nonode nohost
  • レコードの読み込みと更新
    > users:setup().
    > rr("records.hrl").
    > ets:lookup(users, "Alice").
    > ets:lookup(users, "Carol").
    > Alice = hd(ets:lookup(users, "Alice")).
    > ets:insert(users, Alice#person{age=17}).
    > ets:lookup(users, "Alice").


Mnesia

分散、並列機能を完全に有した Erlang 付属のDBMS。発音は「エムニージア」でよさそうだ。

  • スキーマ、テーブルの作成
    -module(users).
    -export([setup/0]).
    -include("records.hrl").
    
    setup() ->
      mnesia:create_schema([node()]),
      mnesia:start(),
      mnesia:create_table(person, [{attributes, record_info(fields, person)}]),
    
      F = fun() ->
        mnesia:write(#person{ name="Alice", age=16, phone="123-4567"}),
        mnesia:write(#person{ name="Bob", age=35, phone="000-0000"}),
        mnesia:write(#person{ name="Charlie", age=66, phone="111-1111"})
      end,
    
      mnesia:transaction(F).
    > c(users).
    > rr("records.hrl").
    > users:setup().
    > mnesia:table_info(person, all).
    > tv:start().
  • クエリの実行
    > mnesia:transaction(fun() -> mnesia:read(person, "Alice") end).
    > mnesia:transaction(fun() -> qlc:e(qlc:q( [X || X <- mnesia:table(person)])) end).
    > mnesia:transaction(fun() -> qlc:e(qlc:q(
        [X || X <- mnesia:table(person), X#person.age < 40]
      )) end).
    > mnesia:transaction(fun() -> qlc:e(qlc:q(
        [ {X#person.name, X#person.age} ||
          X <- mnesia:table(person), X#person.age < 40]
      )) end).


References


Related Posts

1.03.2014

Getting Started with Erlang pt.4

Erlang をはじめよう その4


前回 - mog project: Getting Started with Erlang pt.3 の続き

CHAPTER 8: Playing with Processes

プロセスこそが Erlang のキー・コンセプトである。

プロセスIDの確認とメッセージの送受信
> self().
> self() ! test1.
> Pid = self().
> Pid ! test2.
> flush().
> flush().
> self() ! test1.
> receive X -> X end.
> self() ! 23.
> receive Y -> 2 * Y end.


モジュールからプロセスを生成する

このモジュールの場合、一度メッセージを受け取ったらプロセスは即座に終了する。

-module(bounce).
-export([report/0]).

report() ->
  receive
    X -> io:format("Received ~p~n", [X])
  end.

> c(bounce).
> Pid = spawn(bounce, report, []).
> Pid ! 23.
> Pid ! 45.


再帰を利用すれば、永久的にメッセージを受信できるようになる。

-module(bounce).
-export([report/0]).

report() ->
  receive
    X -> io:format("Received ~p~n", [X]),
    report()
  end.
> c(bounce).
> Pid = spawn(bounce, report, []).
> Pid ! 23.
> Pid ! message.


再帰のパラメータを変えることで、シンプルなカウンターを作れる。

-module(bounce).
-export([report/1]).

report(Count) ->
  receive
    X -> io:format("Received #~p: ~p~n", [Count, X]),
    report(Count + 1)
  end.
> c(bounce).
> Pid = spawn(bounce, report, [1]).
> Pid ! test.
> Pid ! 123.
> Pid ! message.


以下のように、receive の戻り値を利用してもよい。

-module(bounce).
-export([report/1]).

report(Count) ->
  NewCount = receive
    X -> io:format("Received #~p: ~p~n", [Count, X]),
    Count + 1
  end,
  report(NewCount).


プロセスの登録

引き続き同じ bounce.erl を使用。

> Pid1 = spawn(bounce, report, [1]).
> register(bounce, Pid1).
> regs().
> bounce ! hello.
> bounce ! 123.
> bounce2 ! test.    % error
> GetBounce = whereis(bounce).
> unregister(bounce).
> regs().
> whereis(bounce).
> GetBounce ! "Still there?".


プロセスが異常終了するとき
-module(fragile).
-export([report/0]).

report() ->
  receive
    X -> io:format("Divided to ~p~n", [X/2]),
    report()
  end.
> c(fragile).
> Pid = spawn(fragile, report, []).
> Pid ! 38.
> Pid ! 0.
> Pid ! one.
> Pid ! 10.

既に終了してしまったプロセスに対してメッセージを送っても、何も起こらない。


メッセージのコールバック
-module(shop).
-export([buy/0]).

buy() ->
  receive
    {From, Item, Number} ->
      From ! {Item, Number, price(Item, Number)},
      buy()
  end.

price(apple, Num)  when Num >= 0 -> 100 * Num;
price(banana, Num) when Num >= 0 -> 200 * Num;
price(_, Num)      when Num >= 0 -> 500 * Num.
price(_, _)                      -> 0.
> c(shop).
> P = spawn(shop, buy, []).
> P ! {self(), apple, 10}.
> P ! {self(), banana, 20}.
> flush().


関数の中でプロセスを生成する
-module(async_shop).
-export([async_shop/0]).

async_shop() ->
  Shop = spawn(shop, buy, []),
  buy(Shop).

buy(Shop) ->
  receive
    {Item, Number} ->
      Shop ! {self(), Item, Number},
      buy(Shop);
    {Item, Number, Price} ->
      io:format("You bought ~p ~p(s) for ~p Yen.~n", [Number, Item, Price]),
      buy(Shop)
  end.
> c(async_shop).
> P = spawn(async_shop, async_shop, []).
> P ! {apple, 10}.
> P ! {banana, 20}.


プロセスの状態を確認する
> pman:start().

GUI が起動する。特定のプロセスをダブルクリックすると、ヒープサイズなどの詳細な情報を得られる。
そのプロセスでメッセージの送受信が行われれば、その内容も表示される。

Pman Process 0 41 0 on nonode nohost


プロセスどうしのリンク
  • リンクしない場合
    > pman:start().
    > P = spawn(async_shop, async_shop, []).
    > P ! {apple, one}.

    子プロセス(shop)がエラーで終了した後も、親プロセス(async_shop)が残り続ける。

  • リンクした場合
    -module(async_shop).
    -export([async_shop/0]).
    
    async_shop() ->
      Shop = spawn_link(shop, buy, []),
      buy(Shop).
    
    buy(Shop) ->
      receive
        {Item, Number} ->
          Shop ! {self(), Item, Number},
          buy(Shop);
        {Item, Number, Price} ->
          io:format("You bought ~p ~p(s) for ~p Yen.~n", [Number, Item, Price]),
          buy(Shop)
      end.
    > c(async_shop).
    > pman:start().
    > P = spawn(async_shop, async_shop, []).
    > P ! {apple, one}.

    子プロセス(shop)がエラーで終了したら、親プロセス(async_shop)も終了する。 (リンクは常に双方向)


エラートラップと新しいプロセスの生成
-module(async_shop).
-export([async_shop/0]).

async_shop() ->
  process_flag(trap_exit, true),
  Shop = spawn_link(shop, buy, []),
  buy(Shop).

buy(Shop) ->
  receive
    {Item, Number} ->
      Shop ! {self(), Item, Number},
      buy(Shop);
    {'EXIT', Pid, Reason} ->
      io:format("FAILURE: ~p died because of ~p.~n", [Pid, Reason]),
      NewShop = spawn_link(shop, buy, []),
      buy(NewShop);
    {Item, Number, Price} ->
      io:format("You bought ~p ~p(s) for ~p Yen.~n", [Number, Item, Price]),
      buy(Shop)
  end.
> c(async_shop).
> pman:start().
> P = spawn(async_shop, async_shop, []).
> P ! {apple, one}.
> P ! {apple, 10}.
> P ! {banana, two}.

エラーをトラップしてメッセージが出力された後、即座に新しいプロセスが立ち上がる。
GUI では、エラーが発生するたびに shop:buy/0 の実行プロセスIDが新しくなっていくのを確認できる。


References


Related Posts

Getting Started with Erlang pt.3

Erlang をはじめよう その3


前回 - mog project: Getting Started with Erlang pt.2 の続き

CHAPTER 5: Communicating with Humans


文字列リテラル

Unicode も標準で扱うことができる。

> io:format("h\"e\'l'l\\o\s\127\x4f\trld\n").
> io:format("~p ~p ~p ~w ~s ~c ~tc ~i ~n", [100, true, "yes", "yes", "yes", 88, 16#3042, 200]).
> $1.
> $A.
> $ .
> $あ.
文字列の操作

各種標準関数など。

> "erl" ++ "ang" == "erlang"
> string:concat("erl", "ang") =:= "erlang".
> hd("hello").
> hd('hello').    % error (this is an atom)
> length("hello").
> lists:nth(2, "hello").
> io:format("~c~n", [lists:nth(2, "hello")]).
> string:chr("hello", $l).
> string:str("hello", "lo").
> string:substr("hello", 3).
> string:substr("hello", 3, 2).
> string:sub_string("hello", 3, 4).
> string:tokens("this is a token.", " .").
> string:join(["one", "two", "three"], ",").
> string:words("this is a word.").
> string:chars($*, 10).
> string:copies("* ", 10).
> string:strip(" x  \n").
> string:strip(" x  ").
> string:left("x", 10).
> string:right("x", 10).
> string:centre("x", 10).
> lists:reverse("erlang").
> string:to_float("1.1 2 3").
> string:to_float("1 2 3").
> string:to_integer("1 2 3").
> string:to_integer("a1 2 3").
> string:to_lower("Hello World!").
> string:to_upper("Hello World!").
> integer_to_list(123).
> float_to_list(123.45).
> erlang:fun_to_list(fun(X) -> X * 2 end).
> list_to_atom("Hello").
ユーザ入力の読み取り
> io:read(">>> ").
>>> [1,2,3].
> io:read(">>> ").
>>> True.    % error
> io:get_chars(">>> ").
>>> 1
> io:get_line(">>> ").
>>> 1 2 3


CHAPTER 6: Lists


基本的な操作
> [1,X,4,Y] = [1,2,4,8].
> {X, Y}.
> lists:flatten([1,[2,4,8],16]).
> [1,2,4] ++ [8,16].
> lists:append([1,2,4], [8,16]).
> lists:append([[1,2,4], [8,16], [32,64]]).
> lists:seq(1, 10).
> lists:seq($A, $Z).
head と tail の操作
> [H1 | T1] = [1, 2, 4].
> {H1, T1}.
> [H2 | T2] = [1].
> {H2, T2}.
> [H3 | T3] = [].
> F = (fun ([], _) -> 1; ([Head|Tail], Fun) -> Head * Fun(Tail, Fun) end).
> F([1,2,4,16], F).
> [1|[2,3]].
> [1,2|[3]].
> [1,2|3].
> [[1,2]|[3]].
zip と key-value 操作
> T = lists:zip([1,2,3,4,5], [a,b,c,d,e]).
> lists:unzip(T).
> lists:keystore(7,1,[{1,tiger}, {3,bear}],{7,panther}).
> lists:keyreplace(7,1,[{1,tiger}, {3,bear}],{7,panther}).
> lists:keyfind(3,1,[{1,tiger}, {3,bear}, {7,panther}]).
> lists:keyfind(4,1,[{1,tiger}, {3,bear}, {7,panther}]).


CHAPTER 7:
Higher-Order Functions and List Comprehensions


単純な高階関数
> Tripler = fun (Value, Function) -> 3 * Function(Value) end.
> Tripler(6, fun(X)->20*X end).
> X=20.
> F=fun(Value)->X * Value end.
> f(X).
> X.    % 'X' is unbound
> Tripler(6, F).
> Tripler(math:pi(), fun math:cos/1).
高階関数を使ってリストを操作する
> Print = fun(Value) -> io:format("  ~p~n", [Value]) end.
> List = [1,1,2,3,5,8,13].
> lists:foreach(Print, List).
> lists:map(fun(Value) -> Value * Value end, List).
> [Value * Value || Value  lists:filter(fun(Value) -> (Value >= 3) and (Value rem 2 == 1) end, List).
> lists:filter(fun(Value) -> (Value >= 3) and (Value rem 2 == 1) end, List).
> [Value || Value = 3, Value rem 2 == 1].
> [Value || Value  lists:all(fun(Value) -> Value > 0 end, List).
> lists:any(fun(Value) -> Value < 0 end, List).
> lists:partition(fun(Value) -> (Value >= 3) and (Value rem 2 == 1) end, List).
> lists:dropwhile(fun(Value) -> Value =< 3 end, List).
> lists:takewhile(fun(Value) -> Value =< 3 end, List).
> lists:foldl(fun(Value, Accumulator) -> Value - Accumulator end, 0, [1,2,3,4]).
> 4-(3-(2-(1-0))).
> lists:foldr(fun(Value, Accumulator) -> Value - Accumulator end, 0, [1,2,3,4]).
> 1-(2-(3-(4-0))).


References


Related Posts

12.31.2013

Getting Started with Erlang pt.2

Erlang をはじめよう その2


前回 - mog project: Getting Started with Erlang pt.1 の続き

CHAPTER 3: Atoms, Tuples, and Pattern Matching


アトム

アトムを利用したパターンマッチ、ブール値を示す特別なアトム

> hello.
> F = (fun(apple, Num) -> 100 * Num; (banana, Num) -> 200 * Num end).
> F(apple, 2).
> F(banana, 3).
> F(candy, 4).    % error
> 3<2.
> 3>2.
> 10 == 10.
> true and true.
> true or false.
> false xor false.
> not false.
ガード

when句、アンダースコアの利用

> Abs = (fun (Num) when Num =< 0 -> -Num; (Num) when Num > 0 -> Num end).
> Abs(-10).
> Abs(0).
> Abs(3).
> Abs = (fun (Num) when Num  -Num; (Num) when Num >= 0 -> Num end).  % error
> Abs2 = (fun
> (Num) when Num < 0 -> -Num;
> (0) -> 0;
> (Num) -> Num
> end).
> Abs2(-5).
> _.
> _ = 20.
> _.
> F = (fun(apple, Num) -> 100 * Num; (_, Num) -> 500 * Num end).
> F(apple, 3).
> F(candy, 10).
> G = (fun(apple, Num) -> 100 * Num; (_, _) -> 1 end).
> G(hello, world).
タプル

タプルの操作、パターンマッチでの利用

> {atom, 123, "string"}.
> T = {atom, 123, "string"}.
> element(2, T).
> setelement(2, T, 456).
> tuple_size(T).
> {A, B, C} = T.
> A.
> B.
> C.
> F = (fun ({apple, Num}) -> 100 * Num; ({banana, Num}) -> 200 * Num end).
> F({apple, 3}).

タプルを使った実装の隠蔽 (カプセル化)

-module(shop).
-export([buy/1]).

buy({Item, Num}) -> buy(Item, Num).

buy(apple, Num)  when Num >= 0 -> 100 * Num;
buy(banana, Num) when Num >= 0 -> 200 * Num;
buy(_, Num)      when Num >= 0 -> 500 * Num;
buy(_, _)                      -> 0.
> c(shop).
> shop:buy({apple, 3}).
> shop:buy({banana, 2}).
> shop:buy({candy, 1}).
> shop:buy({apple, -1}).
> shop:buy(apple, 3).    % error

CHAPTER 4: Logic and Recursion


case 構成要素 (case construct)

case は値を返す。case 内部でガードを行うことも可能。

> F = fun (Item, Num) ->
>   case Item of
>     apple -> 100 * Num;
>     banana -> 200 * Num
>   end
> end.
> F(apple, 3).
> G = fun (Item, Num) ->
>   X = case Item of
>     apple -> 100;
>     banana when Num >= 5 -> 198;
>     banana -> 200
>   end,
>   X * Num
> end.
> G(banana, 3).
> G(banana, 10).
if 構成要素 (if construct)
> F = fun (Item, Num) ->
> X = 100.
> if X >= 99 -> 'good' end.
> if X =< 99 -> 'good' end.
> F = fun(X) ->
>   if
>     X =< 99 -> io:format("X is less than ~w.~n", [100]);
>     true -> true
>   end
> end.
> F(10).
> F(100).
> A = 10.
> B = if A == 5 -> 100; true -> 20 end.
> B.
> BadFun = fun (X) ->
>   if
>     X < 0 -> Y = 1;
>     X >= 0 -> Z = 2
>   end,
>   Y + Z
> end.
再帰

カウントダウン

-module(count).
-export([countdown/1]).

countdown(From) when From > 0 ->
  io:format("~w!~n", [From]),
  countdown(From - 1);

countdown(From) ->
  io:format("blastoff!~n").
> c(count).
> count:countdown(10).

階乗

-module(fact).
-export([factorial/1]).

factorial(N) when N =< 1 -> 1;
factorial(N) -> N * factorial(N - 1).
> c(fact).
> fact:factorial(10).

階乗 (アキュムレーター付き)

-module(fact).
-export([factorial/1]).

factorial(N) -> factorial(1, N, 1).

factorial(Current, N, Result) when Current =< N ->
  factorial(Current + 1, N, Result * Current);
factorial(Current, N, Result) -> Result.
> c(fact).
> fact:factorial(10).


References


Related Posts

12.25.2013

Getting Started with Erlang pt.1

Erlang をはじめよう その1


本ブログ初のErlangエントリ。

Introducing Erlang - O'Reilly Media を読みながら、実行したコマンドを自身の復習のために書き連ねていく。

どのような結果になるか、考えながら手を動かしていくスタイル。
尚、以下に記載している内容は、書籍のサンプルコードとは異なります。

  • 凡例
    $     ===> OS のシェルプロンプト
    >     ===> Erlang Shell で実行
    %     ===> インラインコメント
    

CHAPTER 1: Getting Comfortable

Erlang Shell での基本的な操作。

起動と終了

erl コマンドを実行し、Erlang Shell を起動する。 (Windows の場合は werl コマンド)

$ erl
>     % Ctrl+G を押下
User switch command
 --> ?
 --> q
>     % Ctrl+C を押下
BREAK: (a)bort (c)ontinue (p)roc info (i)nfo (l)oaded
       (v)ersion (k)ill (D)b-tables (d)istribution
a
> q().
> init:stop().
ディレクトリとヒストリの操作

Erlang Shell 組み込みコマンド。

1> help().
2> pwd().
3> ls().
4> h().
5> v(2).
6> results(3).
7> h().
8> v(2).    % エラー
8> v(-1).
9> e(2).
10> history(3).
11> h().
12> e(2).    % エラー
12> e(-1).
13> cd(..).    % エラー
13> cd("..").
14> cd("/tmp").
15> pwd().
数値の操作

どの処理でエラーが発生するか?

> 1+2.
> 10 - 100.
> 1+3.0.
> 100 * 10.
> 10.0 * 0.
> 100/33.
> 100 div 33.
> 100 rem 33.
> 100/0.
> -100.0/0.0.
> 0.0/0.0.
> 100 div -33.
> -100 div 33.
> 100 rem -33.
> -100 rem 33.
> -100 rem -33.
> 5 - 4 * (3 + 2).
> round(100/22).
> math:sin(math:pi()/2).
> math:sin(math:pi()).
> math:cos(0).
> math:pow(2, 10).
> math:pow(10, 333).
> 2#1111.
> -16#f0f0.
> 16#fffffffffffffffff.
> 36#a3Z.
> bnot 10.
> bnot -1.
> 5 band 15.
> -1 band -2.
> 5 bor 11.
> 5 bxor 11.
> 11 bsl 2.
> 11 bsr 2.
> 1 bsr 10.
> -1 bsr 10.
> 1 bsl 1000.
変数の操作

どの操作でエラーが発生するか?

> n=10.
> N=10.
> N=11.
> 10=N.
> 11=N.
> 25 = N * 2 + N div 2.
> N * 2 + N div 2 = 25.
> M=N+1.
> M=N+1.
> N+1=M.
> 11=M.
> M=11.
> b().
> f(M).
> b().
> M=N*3.
> N=11.
> f().
> N=M.
> N=11.


CHAPTER 2: Functions and Modules

引き続き Erlang Shell で実行。

関数の定義

今日はクリスマス。というわけで、ケーキの代金を求める Price 関数を作る。
ドル払い(端数は四捨五入)もできるようにしますよ。

> Price = fun(Num) -> trunc(348 * Num * 1.05) end.
> Yen_to_dollar = fun(Yen) -> round(Yen / 104.288) end.
> b().
> Price(3).
> Yen_to_dollar(Price(4)).
> Num.
> Yen.
> Price1 = Fun(Num) -> trunc(348 * Num * 1.05) end.
> price2 = fun(Num) -> trunc(348 * Num * 1.05) end.
> Price3 = fun(num) -> trunc(348 * num * 1.05) end.
> Price3(10).
モジュールの定義

ファイル(仮に prices.erl とする)に以下の内容を保存。

-module(prices).
-export([price/1, yen_to_dollar/1]).

price(Num) -> trunc(348 * Num * 1.05).
yen_to_dollar(Yen) -> round(Yen / 104.288).

Erlang Shell から、そのモジュールを利用できる。

> ls().
> prices:price(3).
> c(prices).
> ls().    % どのような拡張子のファイルが生成されるか?
> prices:price(3).
> prices:yen_to_dollar(10000).
ドキュメント(EDoc)の生成

ファイル(prices.erl)の内容を更新。

%% @author mogproject [http://mogproject.blogspot.com]
%% @doc Functions calculating price of cakes.
%% @reference REFERENCE HERE
%% @copyright 2013 by mogproject
%% @version 0.1

-module(prices).
-export([price/1, yen_to_dollar/1]).

%% @doc Calculates price of cakes.
%% You should specify how many cakes you want.

-spec(price(integer()) -> integer()).

price(Num) -> trunc(348 * Num * 1.05).

%% @doc Exchange yen to dollar.

-spec(yen_to_dollar(integer()) -> integer()).

yen_to_dollar(Yen) -> round(Yen / 104.288).

Erlang Shell で以下のコマンドを実行。

> edoc:files(["prices.erl"], [{dir, "doc"}]).

doc サブディレクトリ配下に各種HTMLファイルが作られるので、その内容をブラウザで確認しよう。

Screenshot 12 25 13 03 16