ラベル AWS の投稿を表示しています。 すべての投稿を表示

10.24.2015

Launching Windows Server in Amazon Web Services

AWS で Windows サーバ (EC2) を起動する


インスタンスの作成

  • AWSマネジメントコンソール にサインイン
  • サービス -> EC2
  • 画面右上のメニューからリージョンを選択: 今回は節約のため「米国東部 (バージニア北部)」
  • EC2 ダッシュボード -> インスタンスの作成


ステップ 1: Amazon マシンイメージ (AMI)
  • クイックスタート -> Microsoft Windows Server 2012 R2 Base (64ビット) を選択
    • 日本語版を使用したい場合は、コミュニティ AMI -> 「2012-R2 Japanese Base」などで検索して見つかったものを選択
ステップ 2: インスタンスタイプの選択
  • t2.micro を選択し、「次の手順: インスタンスの詳細の設定」をクリック
ステップ 3: インスタンスの詳細の設定
  • デフォルトのまま、「次の手順: ストレージの追加」をクリック
ステップ 4: ストレージの追加
  • ルートディスクが 30GB 以上でないと作成に失敗する。
  • 「次の手順: インスタンスのタグ付け」をクリック
ステップ 5: インスタンスのタグ付け
  • キー: Name
  • 値: win2012-1 (適宜設定)
  • 「次の手順: セキュリティグループの設定」をクリック
ステップ 6: セキュリティグループの設定
  • セキュリティグループの割り当て: 新しいセキュリティグループを作成する
  • セキュリティグループ名: security-win
  • 説明: Security group for Windows servers
  • タイプ: RDP (プロトコル: TCP, ポート範囲: 3389)
  • 送信元: マイIP
  • 「確認と作成」をクリック
ステップ 7: インスタンス作成の確認
  • 「作成」をクリック
  • 既存のキーペアを選択するか、新しいキーペアを作成します。
    • 新しいキーペアの作成
    • キーペア名: aws-win (適宜設定)
    • 「キーペアのダウンロード」をクリック
    • aws-win.pem をダウンロードし保存
      $ mv -i ~/Downloads/aws-win.pem ~/.ssh/
      $ chmod 600 ~/.ssh/aws-win.pem
  • 「インスタンスの作成」をクリック
  • 作成処理に成功したら、「インスタンスの表示」をクリック


パスワードの入手

  • 起動してから数分後、インスタンス一覧の画面で Windows サーバを右クリックし
    「Windows パスワードの取得」を選択

  • キーペアのパス: aws-win.pem の保存先を選択
  • 「パスワードの暗号化」をクリック
  • 画面に以下の情報が表示される
    • パブリック IP
    • ユーザー名
    • パスワード


リモートデスクトップ接続

  • Mac から Windows に接続する場合、まず App Store から Microsoft Remote Desktop をインストールする
  • アプリ起動後、New で新規接続情報を入力
    • Connection name: win2012-1
    • PC name: (先程入手したパブリックIP)
    • User name: Administrator
    • Password: (先程入手したパスワード)
    • Start session in full screen: チェックを外す (お好みで)
    • Use all monitors: チェックを外す
      (デュアルディスプレイの場合に、Windows側 も 2画面になってしまうのを防ぐ)
  • 接続時、Verify Certificate のウィンドウが出たら、
    Show Certificate -> Always trust ... にチェックを付けてから Continue をクリック
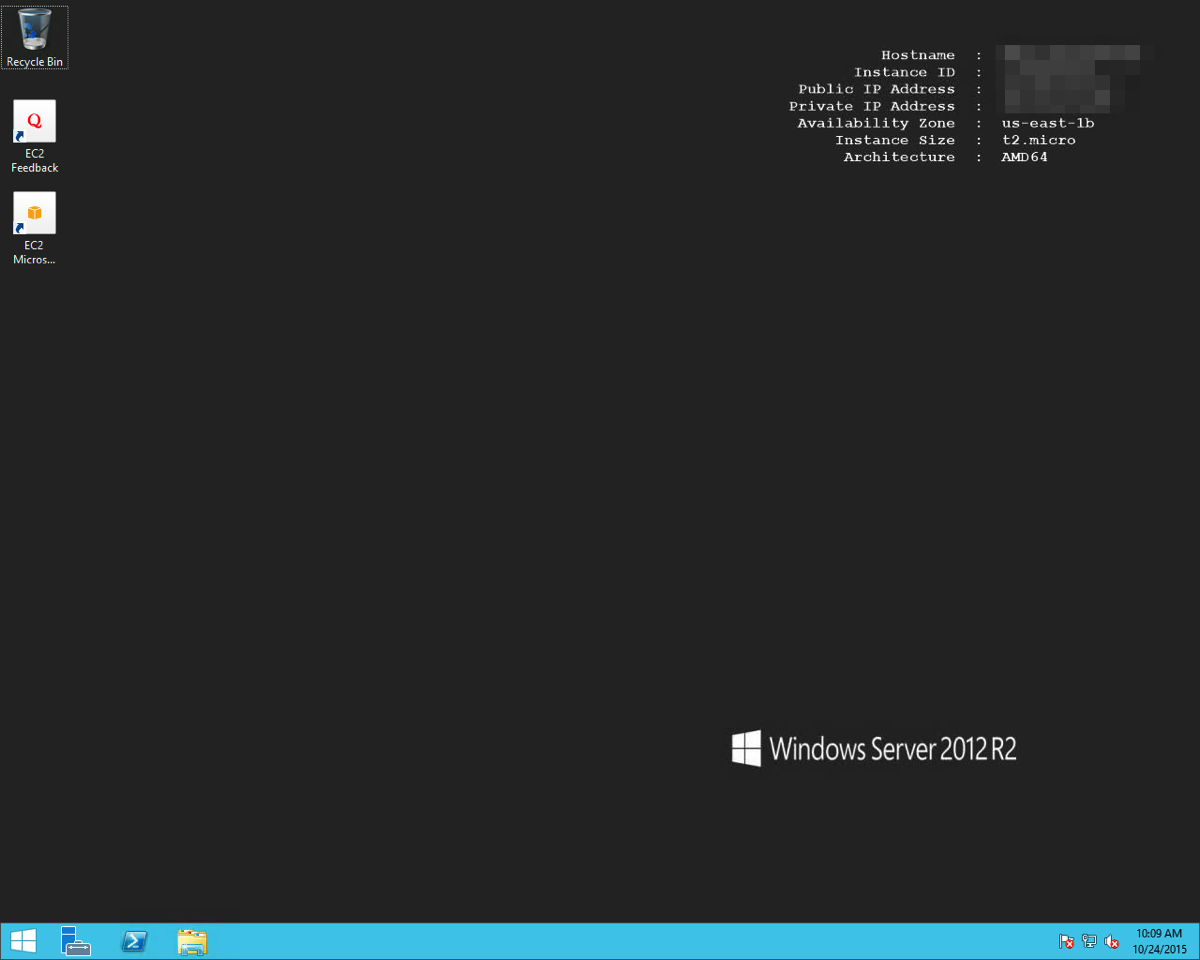
  • フルスクリーンの切り替えは Command+1 でできる

Fullscreen 10 24 15 7 09 PM


Windows 上で Python をセットアップしてみる

  • Internet Explorer を起動し、Python 公式サイトからインストーラーをダウンロードし実行。
  • PowerShell 上でパスを通す
    setx PATH $Env:PATH";C:\Python27;C:\Python27\Scripts"
  • その後、PowerShell の落とし上げをすれば、python や pip が使えるようになる。


数百円で、すぐに使える Windows 環境が手に入るのは本当に素晴らしい。

1.07.2015

artifact-cli - Private Artifact Manager

artifact-cli - プライベートなアーティファクト管理ツール


モチベーション

  • 元々は Scala の all-in-one バイナリの世代管理が目的
    • play dist とか sbt one-jar とか sbt assembly で作られる 1個の zip/jar ファイルが対象
    • ゴールはデプロイ/リカバリ運用の可視化と効率化
  • リッチなデータベースに依存せず、極力シンプルな、どこでもすぐに使えるツール
    • Artifactory のようなツールで実現可能なのかもしれないが未調査
  • Amazon S3 をデータストアとして使いたい


コード

Python で書いた。

PyPI にも登録済み。


インストール

  • Python 2.6/2.7 で動作確認済み
  • Python のパッケージ管理ツール pip が未導入であれば、まずインストール
  • 以下のコマンドを実行すれば、art コマンドが利用可能となる
    pip install artifact-cli
    環境によっては sudo を付ける必要あり。アップグレードは --upgrade オプションを付ければOK。


セットアップ


AWS 環境の準備 (必須)

手順の詳細は割愛。

  • AWS アカウント作成
  • 適切な権限を持った IAM ユーザの作成と API アクセスキー・シークレットキーの取得
  • Amazon S3 バケット作成


設定ファイルの記述 (任意)

設定ファイルのデフォルトパスは ~/.artifact-cli。以下は記述例。

[default]
aws_access_key_id = XXXXXXXXXXXXXXXXXXXX
aws_secret_access_key = XXXXXXXXXXXXXXXXXXXXXXXXXXXXXXXXXXXXXXXX
bucket = your-bucket-name
region = your-region (e.g. ap-northeast-1, us-east-1)


使用例


バージョン確認
$ art --version
artifact-cli 0.0.5


ヘルプ表示
$ art -h
Usage:
  art [options] list     GROUP
  art [options] upload   GROUP LOCAL_PATH
  art [options] download GROUP LOCAL_PATH [REVISION | latest]
  art [options] info     GROUP FILE_NAME  [REVISION | latest]
  art [options] delete   GROUP FILE_NAME   REVISION

  e.g.
   GROUP     : your.company
   LOCAL_PATH: /path/to/awesome/target/scala-2.11/awesome-assembly-1.2.3.jar
   FILE_NAME : awesome-assembly-1.2.3.jar
   REVISION  : 10

Options:
  --version            show program's version number and exit
  -h, --help           show this help message and exit
  --config=CONFIG      path to the config file
  --check              prints only the information to upload, download or
                       delete
  --force              upload file even when it is already registered to the
                       repository
  --output=OUTPUT      specify output format, "text" or "json" (default: text)
  --access=ACCESS_KEY  AWS access key id
  --secret=SECRET_KEY  AWS secret access key
  --bucket=BUCKET      Amazon S3 bucket name
  --region=REGION      Amazon S3 region name (default: us-east-1)


ビルド済みアーティファクトのアップロード
$ art upload your-group-id /path/to/your/project/target/scala-2.11/your-project-assembly-0.1.0-SNAPSHOT.jar
[INFO] Reading index: s3://bucket-name/your-group-id/artifact-cli-index.json
[INFO] Uploading artifact:
Basic Info:
  Group ID   : your-group-id
  Artifact ID: your-project-assembly
  Version    : 0.1.0-SNAPSHOT
  Packaging  : jar
  Revision   : 1
File Info:
  User    : user@hostname
  Modified: 2014-11-19 02:57:50
  Size    : 29689482 (28.3MiB)
  MD5     : 1afdc6c1b7aaad744a72696c33bd55eb
Git Info:
  Branch             : master
  Tags               : release_xxxxxx
  Last Commit Author : Your Name <mail@example.com>
  Last Commit Date   : 2014-12-03 22:15:09
  Last Commit Summary: implement awesome feature
  Last Commit SHA    : 825637d5dfe119ef624cc9b02b027d9cf9aa1a33

[INFO] Uploading file: s3://bucket-name/your-group-id/your-project-assembly/0.1.0-SNAPSHOT/1/your-project-assembly-0.1.0-SNAPSHOT.jar
[INFO] Writing index: s3://bucket-name/your-group-id/artifact-cli-index.json

任意の「グループID」(文字列)の指定が必要。
ファイルのパスを指定するだけで Git の情報も自動的に収集。
リビジョン番号は 1から順に自動採番。


アーティファクト一覧表示
$ art list your-group-id
FILE                                         #    SIZE      BUILD                 TAGS             SUMMARY
------------------------------------------------------------------------------------------------------------------------------
your-project-assembly-0.1.0-SNAPSHOT.jar      1   28.3MiB   2014-11-19 02:57:50   release_xxxxxx   implement awesome feature


最新版アーティファクトのダウンロード
$ art download your-group-id /tmp/your-project-assembly-0.1.0-SNAPSHOT.jar latest
[INFO] Reading index: s3://bucket-name/your-group-id/artifact-cli-index.json
[INFO] Downloading artifact:
Basic Info:
  Group ID   : your-group-id
  Artifact ID: your-project-assembly
  Version    : 0.1.0-SNAPSHOT
  Packaging  : jar
  Revision   : 1
File Info:
  User    : user@hostname
  Modified: 2014-11-19 02:57:50
  Size    : 29689482 (28.3MiB)
  MD5     : 1afdc6c1b7aaad744a72696c33bd55eb
Git Info:
  Branch             : master
  Tags               : release_xxxxxx
  Last Commit Author : Your Name <mail@example.com>
  Last Commit Date   : 2014-12-03 22:15:09
  Last Commit Summary: implement awesome feature
  Last Commit SHA    : 825637d5dfe119ef624cc9b02b027d9cf9aa1a33

[INFO] Downloaded: /tmp/your-project-assembly-0.1.0-SNAPSHOT.jar


CI 関連

カバレッジ 100% は気持ちいい。

11.06.2014

Cheat Sheets for My Sake

自分向け各種チートシートまとめ


自分が忘れがち or 使用頻度の高い事柄だけ書いておく。

11.05.2014

Ansible: Visualizing CloudWatch Metrics with Grafana

Ansible: Grafana で CloudWatch のメトリクスを可視化するための Playbook


tl;dr

Grafana に触れてみたいなら、まずは Grafana Play Home


目的
  • AWS CloudWatch の各種メトリクスを Grafana で見たい
  • Grafana の URL は SSL + ベーシック認証で保護したい
  • これらのセットアップ作業を Ansible で自動化したい


使ったもの
  • Amazon CloudWatch: AWS 標準の監視コンソール。メトリクスデータが蓄積している前提
  • Amazon EC2
    • Amazon Linux: インスタンスを1台立ち上げ、この中に全てをインストールする
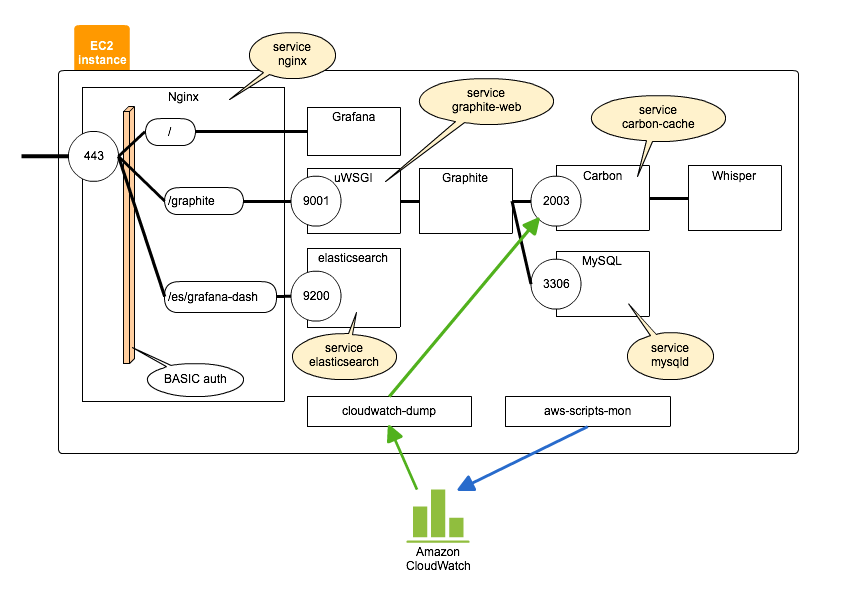
  • Nginx: フロントエンドの Web サーバ。BASIC認証 + 自己署名証明書によるSSL通信を設定。
  • Grafana: メトリクスデータの可視化ツール
  • Graphite: メトリクスデータ管理システム
    • uWSGI: フロントエンド連携用に必要
    • MySQL: Graphite のデータストアとして使う
  • cloudwatch-dump: CloudWatch のメトリクスデータを取得し、Graphite に流し込むために使用
  • Ansible: セットアップ(プロビジョニング)の自動化


コード

こちらのリポジトリに Vagrant + Ansible コード一式と再現手順を書いた。

必要なソフトウェア/プラグインをインストール後、vagrant up を行えば以下のような Grafana の画面に触れられるようになる。

Grafana Grafana

Grafana のロゴが表示されないのは https 通信をしているためで、表示させるにはソースコードに手を入れる必要がありそう。


はじめに

システム監視の目的は大きく「異常検知」と「トレンド分析」の2つに分けられる。

また一般に、「トレンド分析」がその対象者に応じて、例えば「システム利用者向け分析」「システム管理者向け分析」「経営判断層層向け分析」の3つのように分類できると、スッキリとしたシステムになりやすい。


今回の構成ではメトリクスデータは一旦 CloudWatch に集約される想定である。

異常検知は CloudWatch が持ち合わせている Alarm 機能で対応する。
Simple Notification Service を使うことでメール送信だけではなく、携帯端末にpush通知を行ったり、特定のURLにhttpリクエストを投げたり、オートスケールを実現したりなど工夫次第でできることは多い。

次に、そのメトリクスデータを一式 Graphite に投入する。
これを Grafana のようなフロントエンドで可視化することにより、異なる対象者に向けたダッシュボードを簡単に作ることができる。
生成されたグラフを週次レポートのような形で定期的に発信するのもよい。


構成イメージ

解説


Vagrantfile
  • プラグイン dotenv を使うことでアカウント固有の定義を別ファイル(.env)に分離
  • (コスト節約のため)米国東部リージョンに t2.micro インスタンスを1個新規構築する
  • Ansible のロールの中で使う変数は、extra_vars として引き渡す
Role: aws-scripts-mon
  • これは本来監視される側のセットアップである
  • CloudWatch の標準機能だけは取得できない Linux 内部の情報(メモリ/スワップ/ディスクスペース使用状況)を CloudWatch に送信する
  • 今回は、ec2-user の ~/aws-scripts-mon ディレクトリ配下にモジュール一式を配置し、Cron で 5分おきにレポーティングが実行されるよう仕掛けた
  • CloudWatch API のアクセスには、EC2 構築時とは別の IAM ユーザ (cloudwatch) を準備した
Role: nginx
  • もちろん Grafana は Apache でも動作する(その方が簡単だ)が、今回は Web サーバとして Nginx を採用する
  • このロールの中で自己署名証明書を作成し、/etc/nginx/cert ディレクトリ配下に配置した
  • 実際のSSLサイトの設定は、Grafana のインストール後に実施する
Role: mysql
  • デフォルトの SQLite でも動作するが、運用を考えるなら MySQL 等のほうが堅い
  • Amazon Linux はデフォルトで利用可能な EPEL リポジトリに対して yum install するだけ  
Role: graphite
  • jsmartin/ansible-graphite を参考にした
  • python-carbon を yum でインストールしたのは、起動スクリプトの有り物を使いたかったので
  • 最初は graphite-web も yum で導入したのだが、/opt/graphite/bin 以下のモジュールがインストールされずエラーが出て面倒なことになったので、最終的にこちらは pip で入れることにした
  • そのため、carbon 関係はFHS準拠っぽいディレクトリ構成なのに graphite の場所は /opt/graphite 配下という状態になっている
  • コマンドによって処理の要否を判定する雛形はこちらにも書いた
  • Whisper のデフォルトのデータ間隔・保持期間を 5分・2年 に書き換えている。(storage-schemas.conf)
    こうすることで長期間の分析をしてもデータが重くならない。(逆に1分単位の分析はできなくなる)
  • 起動がうまくいかない場合は、大抵 /var/log/graphite-web.log を見れば原因がわかるはず 
Role: cloudwatch-dump
  • 自作のダンプツールを pip でインストール
  • ec2-user の ~/cloudwatch-dump ディレクトリ配下にシェルを置き、Cron で 1時間に1回(*:05)、graphite にデータを流し込む
  • 何かあった時でもデータを再投入できるよう、~/cloudwatch-dump/logs に直近のログを残している
    (ローテーションは logrotate を使ったほうが良かったかも)
  • シェルスクリプトの中で、メトリクスパス中に含まれるEC2インスタンスIDをニックネームへの変換している
Role: elasticsearch
  • RPM のダウンロード先を指定して、yum install するだけ
Role: grafana
  • Grafana 自体は独立したツールなので、インストールは素直に終わる
  • カスタマイズは config.js をテンプレートエンジンに乗せて行う。Grafana のバージョンによって微妙に項目が変わっているので注意
  • 最後に Nginx の SSL サイト設定と、BASIC認証用のファイルを作って完了
 
References

Related Posts

11.01.2014

cloudwatch-dump - Dump All the CloudWatch Metrics Statistics

Python: CloudWatch のメトリクスデータを全て出力するスクリプト


概要

1. 特定リージョンの AWS CloudWatch からメトリクスの一覧を取得し、
2. その全てのメトリクスに対して、ある期間を一定の単位時間で「平均」「合計」の統計値を取得し、
3. その結果(メトリクス、数値、タイムスタンプ)を Graphite に投入可能な形式で出力する

そんな Python スクリプトを作成。


モチベーション

やりたいことは、CloudWatch のデータを Grafana で見たいだけ。

Grafana AWS

はじめは Fluentd + fluent-plugin-cloudwatch + fluent-plugin-graphite を使って流し込んでいたのだが、

  • メトリクスと統計方法(Average, Sum, Maximum)を1個1個指定しなければいけなかったり (将来にわたってメンテが必要)
  • ちらほらデータの欠落が見られたり
  • バッファリングの関係か、データが更新されるタイミングを制御しづらかったり
  • 特定期間だけリトライしたい場合に難しかったり
といったことがあったので、1時間おきのバッチ処理で一括インポートをすることにした。
 
とはいえ悩みどころなのが統計方法。
CloudWatch では各サービス・各メトリクスごとに推奨の(意味のある)統計方法が異なっている。

しかし今回は割り切って、全メトリクスについて 平均(Average)、合計(Sum) を取得することにした。
物によっては Maximum を得たい場合もあるが、一旦は目を瞑る。


今後の課題

  • CloudWatch の APIリクエストも決して無制限で使えるわけではないので、極力無駄なリクエストは減らしたい。
    (現時点では100万件/月まで無料, それ以降は1,000件ごとに0.01USDの課金)
    CPU使用率の Sum など、結局個別に指定する他ないのか。
  • 個別のメトリクス統計方法の指定 (DynamoDB の ItemCount の Maximum など) をできるようにするか
  • 並列化をして高速に
  • ユニットテストを充実させる


導入方法、注意事項についてはリポジトリの README参照。

10.22.2014

Ansible: Playbook for AWS CloudWatch Monitoring Scripts

Ansible: CloudWatch 用 Linux 監視スクリプトをインストールする Playbook


前提

  • EC2 インスタンスの OS は Amazon Linux とする
  • 認証情報はファイルに保存する
    • インスタンス作成前であれば、IAM Role の設定により認証情報の保持が不要となる
    • CloudWatch API 専用の IAM ユーザの作成を推奨
  • 各種パラメータについては vars/main.yml を参照
  • 課金が発生する可能性があるので注意


コード

---
- name: install additional perl modules
  yum: name={{ item }} state=present
  with_items:
    - perl-Switch
    - perl-Sys-Syslog
    - perl-LWP-Protocol-https
  tags: aws-scripts-mon

- name: check if script is installed
  command: /usr/bin/test -e {{ path_to_script }}
  ignore_errors: True
  changed_when: False
  register: is_installed
  tags: aws-scripts-mon

- name: download scripts from AWS server
  get_url: url={{ download_url }} dest={{ path_to_download }}
  when: is_installed | failed
  tags: aws-scripts-mon

- name: unzip downloaded file
  unarchive: copy=no src={{ path_to_download }} dest={{ home_dir }}
  when: is_installed | failed
  tags: aws-scripts-mon

- name: create credential file
  template: src={{ item }}.j2 dest={{ script_dir }}/{{ item }} owner={{ user }} group={{ user }} mode="0600"
  with_items:
    - awscreds.conf
  tags: aws-scripts-mon

- name: set directory owner
  file: path={{ script_dir }} state=directory owner={{ user }} group={{ user }} recurse=yes
  tags: aws-scripts-mon

- name: remove downloaded file
  file: path={{ path_to_download }} state=absent
  tags: aws-scripts-mon

- name: set cron
  cron: user={{ user }}
        state=present
        name="CloudWatch monitoring script"
        minute="{{ cron.minute }}"
        hour="{{ cron.hour }}"
        job="{{ cron.job }}"
  tags: aws-scripts-mon
AWSAccessKeyId={{ access_key }}
AWSSecretKey={{ secret_key }}
---
user: ec2-user
version: 1.1.0
filename: CloudWatchMonitoringScripts-v{{ version }}.zip
download_url: http://ec2-downloads.s3.amazonaws.com/cloudwatch-samples/{{ filename }}

path_to_download: "/tmp/{{ filename }}"

home_dir: "/home/{{ user }}"
script_dir: "{{ home_dir }}/aws-scripts-mon"
path_to_script: "{{ script_dir }}/mon-put-instance-data.pl"

access_key: "{{ aws_cloudwatch_agent_access_key_id }}"
secret_key: "{{ aws_cloudwatch_agent_secret_access_key }}"

cron:
  hour: "*"
  minute: "*/5"
  job: "{{ path_to_script }} --mem-util --mem-used --mem-avail --swap-util --swap-used --disk-path=/ --disk-space-util --disk-space-used --disk-space-avail --aws-credential-file={{ script_dir }}/awscreds.conf --from-cron"

credential 情報 (aws_cloudwatch_agent_xxx) は、extra-vars などで渡す想定。


References

10.20.2014

Scala: How to Limit DynamoDB's Range Query

Scala: AWS DynamoDB のテーブルに対して件数制限付きのレンジクエリを実行する


DynamoDB の range クエリについて、理解が足りなかったので整理しておく。

今回は例として、食事の記録を以下の項目とともに DynamoDB に格納し、
ユーザごとの最新 n 件の食事を調べるクエリを投げるようなアプリケーションを考えてみる。

DynamoDB: FoodLog
  • UserId [ハッシュキー]: ユーザID (文字列)
  • Timestamp [レンジキー]: タイムスタンプ(epoch からの経過時間をミリ秒単位で格納) (整数値)
  • Food: 食事した内容 (文字列)
  • Calorie: 摂取カロリー (整数値)


テーブル作成

aws-cli で以下のコマンドを実行し、FoodLog テーブルを作成する。
(aws-cli および認証情報はセットアップ済みの前提)

$ aws dynamodb create-table \
--table-name FoodLog \
--attribute-definitions \
AttributeName=UserId,AttributeType=S \
AttributeName=Timestamp,AttributeType=N \
--key-schema AttributeName=UserId,KeyType=HASH AttributeName=Timestamp,KeyType=RANGE \
--provisioned-throughput ReadCapacityUnits=1,WriteCapacityUnits=1


ベース部分実装

Java のライブラリと O/R マッパーを使って FoodLog クラスを実装。
接続情報は環境変数(AWS_ACCESS_KEY, AWS_SECRET_KEY)より与えられる想定である。

package com.github.mogproject.example.dynamodb

import com.amazonaws.auth.BasicAWSCredentials
import com.amazonaws.regions.RegionUtils
import com.amazonaws.services.dynamodbv2.AmazonDynamoDBClient
import com.amazonaws.services.dynamodbv2.datamodeling._

import scala.annotation.meta.beanGetter
import scala.beans.BeanProperty
import scala.collection.JavaConverters._

trait DynamoDBClient {
  private[this] val accessKeyId = sys.env("AWS_ACCESS_KEY")
  private[this] val secretAccessKey = sys.env("AWS_SECRET_KEY")
  private[this] val region = RegionUtils.getRegion("ap-northeast-1")
  private[this] val endpoint = region.getServiceEndpoint("dynamodb")

  private[this] val credentials = new BasicAWSCredentials(accessKeyId, secretAccessKey)
  private[this] val client = {
    val ret = new AmazonDynamoDBClient(credentials)
    ret.setRegion(region)
    ret.setEndpoint(endpoint)
    ret
  }
  protected val mapper = new DynamoDBMapper(client)

  def batchSave(xs: FoodLog*) = mapper.batchSave(xs.asJava)

  def batchDelete(xs: FoodLog*) = mapper.batchDelete(xs.asJava)

  def batchWrite(toWrite: Seq[FoodLog], toDelete: Seq[FoodLog]) = mapper.batchWrite(toWrite.asJava, toDelete.asJava)
}

@DynamoDBTable(tableName = "FoodLog")
case class FoodLog(
                    @(DynamoDBHashKey@beanGetter)(attributeName = "UserId") @BeanProperty var userId: String,
                    @(DynamoDBRangeKey@beanGetter)(attributeName = "Timestamp") @BeanProperty var timestamp: Long,
                    @DynamoDBAttribute(attributeName = "Food") @BeanProperty var food: String,
                    @DynamoDBAttribute(attributeName = "Calorie") @BeanProperty var calorie: Int
                    ) {
  def this() = this(null, 0, null, 0)
}

object FoodLog extends DynamoDBClient {
  def readRecent(userId: String, limit: Int): Seq[FoodLog] = ???
}


テストデータ投入

REPL を使い、2ユーザx10件ずつのランダムなテストデータを投入する。

$ export AWS_ACCESS_KEY="xxxxxx"
$ export AWS_SECRET_KEY="xxxxxx"
$ sbt console

scala> import com.github.mogproject.example.dynamodb.FoodLog
import com.github.mogproject.example.dynamodb.FoodLog

scala> import scala.util.Random
import scala.util.Random

scala> val item1 = (1 to 10).map(i => FoodLog("user-1", Random.nextInt(100000), s"food-$i", Random.nextInt(2000)))
item1: scala.collection.immutable.IndexedSeq[com.github.mogproject.example.dynamodb.FoodLog] = Vector(FoodLog(user-1,78548,food-1,1911), FoodLog(user-1,67632,food-2,974), FoodLog(user-1,34756,food-3,1639), FoodLog(user-1,15595,food-4,937), FoodLog(user-1,77366,food-5,158), FoodLog(user-1,9615,food-6,393), FoodLog(user-1,64601,food-7,429), FoodLog(user-1,6847,food-8,1834), FoodLog(user-1,55271,food-9,1434), FoodLog(user-1,74394,food-10,885))

scala> val item2 = (1 to 10).map(i => FoodLog("user-2", Random.nextInt(100000), s"food-$i", Random.nextInt(2000)))
item2: scala.collection.>immutable.IndexedSeq[com.github.mogproject.example.dynamodb.FoodLog] = Vector(FoodLog(user-2,15618,food-1,1356), FoodLog(user-2,27456,food-2,123), FoodLog(user-2,62137,food-3,1122), FoodLog(user-2,43501,food-4,673), FoodLog(user-2,80906,food-5,577), FoodLog(user-2,96682,food-6,1112), FoodLog(user-2,40193,food-7,1961), FoodLog(user-2,44857,food-8,1064), FoodLog(user-2,88767,food-9,1618), FoodLog(user-2,42126,food-10,761))

scala> FoodLog.batchSave(item1 ++ item2: _*)
res0: java.util.List[com.amazonaws.services.dynamodbv2.datamodeling.DynamoDBMapper.FailedBatch] = []


クエリ部分(仮)実装

件数制限付きのクエリを素直に書くと、以下のようになる。

  def readRecent(userId: String, limit: Int): Seq[FoodLog] = {
    val query = new DynamoDBQueryExpression[FoodLog]()
      .withHashKeyValues(FoodLog(userId, 0, null, 0))
      .withScanIndexForward(false)
      .withLimit(limit)
      .withConsistentRead(false)
    mapper.query(classOf[FoodLog], query).asScala
  }

そして limit=5 としてクエリを実行すると、結果は …… 10個ある!?

$ sbt console
scala> import com.github.mogproject.example.dynamodb.FoodLog
import com.github.mogproject.example.dynamodb.FoodLog

scala> FoodLog.readRecent("user-1", 5)
res0: Seq[com.github.mogproject.example.dynamodb.FoodLog] = Buffer(FoodLog(user-1,78548,food-1,1911), FoodLog(user-1,77366,food-5,158), FoodLog(user-1,74394,food-10,885), FoodLog(user-1,67632,food-2,974), FoodLog(user-1,64601,food-7,429), FoodLog(user-1,55271,food-9,1434), FoodLog(user-1,34756,food-3,1639), FoodLog(user-1,15595,food-4,937), FoodLog(user-1,9615,food-6,393), FoodLog(user-1,6847,food-8,1834))

scala> res0.size
res1: Int = 10

scala> res0 foreach println
FoodLog(user-1,78548,food-1,1911)
FoodLog(user-1,77366,food-5,158)
FoodLog(user-1,74394,food-10,885)
FoodLog(user-1,67632,food-2,974)
FoodLog(user-1,64601,food-7,429)
FoodLog(user-1,55271,food-9,1434)
FoodLog(user-1,34756,food-3,1639)
FoodLog(user-1,15595,food-4,937)
FoodLog(user-1,9615,food-6,393)
FoodLog(user-1,6847,food-8,1834)


これはどういうことなのか

sbt run で実行可能なプログラムを作成し、build.sbt に以下の記述を行って http-wire ログを出力してみる。

javaOptions in run ++= Seq(
  "-Dorg.apache.commons.logging.Log=org.apache.commons.logging.impl.SimpleLog",
  "-Dorg.apache.commons.logging.simplelog.showdatetime=true",
  "-Dorg.apache.commons.logging.simplelog.log.org.apache.http.wire=DEBUG"
)

fork in run := true

すると、以下のように DynamoDB との通信が 2回発生していることがわかる。

[error] 2014/10/20 01:09:19:440 JST [DEBUG] wire - >> "POST / HTTP/1.1[\r][\n]"
[error] 2014/10/20 01:09:19:441 JST [DEBUG] wire - >> "Host: dynamodb.ap-northeast-1.amazonaws.com[\r][\n]"
(snip)
[error] 2014/10/20 01:09:19:442 JST [DEBUG] wire - >> "{"TableName":"FoodLog","Limit":5,"ConsistentRead":false,"KeyConditions":{"UserId":{"AttributeValueList":[{"S":"user-1"}],"ComparisonOperator":"EQ"}},"ScanIndexForward":false}"
[error] 2014/10/20 01:09:19:468 JST [DEBUG] wire - << "HTTP/1.1 200 OK[\r][\n]"
(snip)
[error] 2014/10/20 01:09:19:478 JST [DEBUG] wire - << "{"Count":5,"Items":[{"UserId":{"S":"user-1"},"Timestamp":{"N":"78548"},"food":{"S":"food-1"},"calorie":{"N":"1911"}},{"UserId":{"S":"user-1"},"Timestamp":{"N":"77366"},"food":{"S":"food-5"},"calorie":{"N":"158"}},{"UserId":{"S":"user-1"},"Timestamp":{"N":"74394"},"food":{"S":"food-10"},"calorie":{"N":"885"}},{"UserId":{"S":"user-1"},"Timestamp":{"N":"67632"},"food":{"S":"food-2"},"calorie":{"N":"974"}},{"UserId":{"S":"user-1"},"Timestamp":{"N":"64601"},"food":{"S":"food-7"},"calorie":{"N":"429"}}],"LastEvaluatedKey":{"Timestamp":{"N":"64601"},"UserId":{"S":"user-1"}},"ScannedCount":5}"
[info] FoodLog(user-1,78548,food-1,1911)
[info] FoodLog(user-1,77366,food-5,158)
[info] FoodLog(user-1,74394,food-10,885)
[info] FoodLog(user-1,67632,food-2,974)
[info] FoodLog(user-1,64601,food-7,429)
[error] 2014/10/20 01:09:19:504 JST [DEBUG] wire - >> "POST / HTTP/1.1[\r][\n]"
[error] 2014/10/20 01:09:19:504 JST [DEBUG] wire - >> "Host: dynamodb.ap-northeast-1.amazonaws.com[\r][\n]"
(snip)
[error] 2014/10/20 01:09:19:505 JST [DEBUG] wire - >> "{"TableName":"FoodLog","Limit":5,"ConsistentRead":false,"KeyConditions":{"UserId":{"AttributeValueList":[{"S":"user-1"}],"ComparisonOperator":"EQ"}},"ScanIndexForward":false,"ExclusiveStartKey":{"UserId":{"S":"user-1"},"Timestamp":{"N":"64601"}}}"
[error] 2014/10/20 01:09:19:533 JST [DEBUG] wire - << "HTTP/1.1 200 OK[\r][\n]"
(snip)
[error] 2014/10/20 01:09:19:533 JST [DEBUG] wire - << "{"Count":5,"Items":[{"UserId":{"S":"user-1"},"Timestamp":{"N":"55271"},"food":{"S":"food-9"},"calorie":{"N":"1434"}},{"UserId":{"S":"user-1"},"Timestamp":{"N":"34756"},"food":{"S":"food-3"},"calorie":{"N":"1639"}},{"UserId":{"S":"user-1"},"Timestamp":{"N":"15595"},"food":{"S":"food-4"},"calorie":{"N":"937"}},{"UserId":{"S":"user-1"},"Timestamp":{"N":"9615"},"food":{"S":"food-6"},"calorie":{"N":"393"}},{"UserId":{"S":"user-1"},"Timestamp":{"N":"6847"},"food":{"S":"food-8"},"calorie":{"N":"1834"}}],"ScannedCount":5}"
[info] FoodLog(user-1,55271,food-9,1434)
[info] FoodLog(user-1,34756,food-3,1639)
[info] FoodLog(user-1,15595,food-4,937)
[info] FoodLog(user-1,9615,food-6,393)
[info] FoodLog(user-1,6847,food-8,1834)

改めてAPIマニュアル(DynamoDBQueryExpression (AWS SDK for Java - 1.9.1))を読む。

Sets the maximum number of items to retrieve in each service request to DynamoDB and returns a pointer to this object for method-chaining.

Note that when calling DynamoDBMapper.query, multiple requests are made to DynamoDB if needed to retrieve the entire result set. Setting this will limit the number of items retrieved by each request, NOT the total number of results that will be retrieved. Use DynamoDBMapper.queryPage to retrieve a single page of items from DynamoDB.

つまるところ、withLimit で指定しているのはクエリ全体の取得件数ではなく、
1回のリクエストで取得するサイズ (サービスリクエストにおける1ページのサイズ) なのである。

DynamoDBMapper.query メソッドは(ページ単位で遅延評価となる)全体の結果セットを返すため、
その結果に map や size などの横断的な処理を適用すると結果セット全体がスキャンされてしまう。

求める結果が最初のページだけでよければ、DynamoDBMapper.queryPage を利用するのが正解だ。


クエリ部分の正しい実装

ハイライト部分を修正。

  def readRecent(userId: String, limit: Int): Seq[FoodLog] = {
    val query = new DynamoDBQueryExpression[FoodLog]()
      .withHashKeyValues(FoodLog(userId, 0, null, 0))
      .withScanIndexForward(false)
      .withLimit(limit)
      .withConsistentRead(false)
    mapper.queryPage(classOf[FoodLog], query).getResults.asScala
  }

結果は想定通り、5個のみとなった。

scala> import com.github.mogproject.example.dynamodb.FoodLog
import com.github.mogproject.example.dynamodb.FoodLog

scala> FoodLog.readRecent("user-1", 5)
res0: Seq[com.github.mogproject.example.dynamodb.FoodLog] = Buffer(FoodLog(user-1,78548,food-1,1911), FoodLog(user-1,77366,food-5,158), FoodLog(user-1,74394,food-10,885), FoodLog(user-1,67632,food-2,974), FoodLog(user-1,64601,food-7,429))

scala> res0.size
res1: Int = 5

scala> res0 foreach println
FoodLog(user-1,78548,food-1,1911)
FoodLog(user-1,77366,food-5,158)
FoodLog(user-1,74394,food-10,885)
FoodLog(user-1,67632,food-2,974)
FoodLog(user-1,64601,food-7,429)

DynamoDBのスキャンが想定外に繰り返されると、応答が遅くなるだけでなく
読み込みキャパシティの限界突破のリスクも非常に高くなる。
このような落とし穴にはよくよく注意が必要である。


さいごに、簡単なベンチマークを行った。

100件のデータを用意し、「limit=5 の全ページスキャン」「limit=5 の最初のページのみスキャン」「limit=100 の最初のページのみスキャン」の所要時間を測定したところ、結果は以下のようになった。

  • limit=5 の全ページスキャン                    : 340msec
  • limit=5 の最初のページのみスキャン      :  19msec
  • limit=100 の最初のページのみスキャン  :  28msec

やはり、DynamoDBに対してHTTP通信を繰り返す(上記の例では20回)のは非常にコストが高い。
全ページのスキャンを行うくらいなら、最初から limit を引き上げたほうが得策だろう。


Source code


References
7.20.2014

AWS: Creating New EC2 Instance in N.Virginia by Vagrant

AWS: 米国東部リージョンの EC2 インスタンスを Vagrant で作成する


AWS を日常的に使うなら、やはり単価の安い米国リージョンを選びたいもの。

しかし安易に日本のインスタンス作成で使った Vagrantfile を使い回すと、以下のような落とし穴にハマる。


エラーメッセージとその対応


アベイラビリティゾーンが無い
InvalidParameterValue => Invalid availability zone: [us-east-1a]

何も考えず、リージョン名に「a」を付けるといきなりハマる。

現在、存在するのは「us-east-1b」「us-east-1c」「us-east-1d」のみ。EC2 -> Dashboard で最新情報を確認できる。


セキュリティグループが無い
The security group 'vagrant' does not exist

リージョン単位で定義を作成する必要がある。一方、IAM のグループ・ユーザは全リージョン共通。


AMI が無い
The image id '[ami-29dc9228]' does not exist

これも、リージョンごとに異なるイメージIDを持っているので、調べ直す必要がある。


ネットワーク環境とセキュリティグループの設定が対応していない
InvalidParameterCombination => VPC security groups may not be used for a non-VPC launch

セキュリティグループを作るとき、適当な VPC を選ぶとこうなる。

米国東部リージョンの場合、「サブネットID」または「ネットワーク・インタフェースID」の指定がない場合、そのインスタンスは non-VPC、つまり EC2-Classic 環境に作成されるようだ。

これに対する正しい対応は、正しい「サブネットID」を Vagrantfile の中で指定すること。

AWS Management Console の Services -> Compute & Networking -> VPC -> Subnets の画面で確認できる。

目的の「VPC」および「アベイラビリティゾーン」に対応したサブネットの「Subnet ID」を控え、以下のような記述を Vagrantfile に追加する。

 aws.subnet_id = "subnet-xxxxxxxx"


インスタンスタイプが Non-VPC に対応していない
VPCResourceNotSpecified => The specified instance type can only be used in a VPC. A subnet ID or network interface ID is required to carry out the request.

セキュリティグループを作るとき、No VPC を選んでしまうとこうなる。
t2.micro インスタンスを立ち上げるためには、VPC に所属させないといけない。


セキュリティグループのグループ名が認識されない
InvalidParameterCombination => The parameter groupName cannot be used with the parameter subnet

aws.security_groups には、セキュリティグループの「Group Name」ではなく「Group ID」(sg-xxxxxxxx) を指定する必要があるようだ。


キーペアが無い
The key pair 'vagrant' does not exist

キーペアもリージョン単位で作成する必要がある。これが最後の難関。


Public IP の永続化

デフォルトの VPC を使えば Public IP が自動的に割り振られるが、これはインスタンスを起動するたびに
変わる可能性がある。

Vagrantfile に次の1行を書けば、自動的に新規の Elastic IP を取得し、立ち上げたインスタンスと紐付けてくれる。
素晴らしい。

aws.elastic_ip = true


References
Related Posts

7.18.2014

How to Monitor Amazon EC2 Instances with NewRelic (Provisioned by Vagrant + Ansible)

New Relic で EC2 インスタンスを監視する方法


目的

Amazon EC2 の新規インスタンスを立ち上げ、New Relic でリソース監視をする。
これを vagrant up コマンド一発で実現したい。

プロビジョニングには Ansible を使う。


事前準備


1. New Relic アカウントの準備


2. AWS Management Console の作業
  • AWS アカウントの作成 (手順割愛)
  • ユーザ・グループ作成
    • Services -> Deployment & Management -> IAM
    • IAM -> Groups: vagrant グループ (Power User Access) を追加
    • IAM -> Users: vagrant ユーザを追加し、vagrant グループに所属。APIキーを確認
  • セキュリティグループ作成
    • Services -> Compute & Networking -> EC2 -> NETWORK & SECURITY -> Security Groups
    • vagrant グループを追加し、Inbound 許可, {SSH, HTTP, HTTPS}, Anywhere を設定
  • SSH鍵の作成
    • Services -> Compute & Networking -> EC2 -> NETWORK & SECURITY -> Key Pairs
    • キーペア vagrant を作成し、vagrant.pem を適当な場所に保存 (例: ~/.ssh/aws-vagrant.pem)


3. プロビジョニング実行環境の整備
  • Vagrant のインストール
  • Vagrant プラグインのインストール
    $ vagrant plugin install vagrant-aws
    $ vagrant plugin install dotenv
     
  • Ansible のインストール


プロビジョニング用ファイルの作成


Vagrantfile


.env ファイル

Vagrantfile と同じディレクトリに「.env」というファイルを作成する。

以下のように認証情報を適宜設定すること。

# default provider
VAGRANT_DEFAULT_PROVIDER="aws"

# credentials
AWS_SSH_USERNAME="ec2-user"
AWS_SSH_KEY="path/to/your/vagrant.pem"
AWS_ACCESS_KEY_ID="your access key id"
AWS_SECRET_ACCESS_KEY="your secret"
AWS_KEYPAIR_NAME="vagrant"
AWS_SECURITY_GROUP="vagrant"

# new relic
NEWRELIC_LICENSE_KEY="your license key"


Ansible 関連ファイル


プロビジョニングの実行

$ vagrant up
Bringing machine 'aws-newrelic-test' up with 'aws' provider...
[aws-newrelic-test] Warning! The AWS provider doesn't support any of the Vagrant
high-level network configurations (`config.vm.network`). They
will be silently ignored.
[aws-newrelic-test] Launching an instance with the following settings...
[aws-newrelic-test]  -- Type: t2.micro
[aws-newrelic-test]  -- AMI: ami-29dc9228
[aws-newrelic-test]  -- Region: ap-northeast-1
[aws-newrelic-test]  -- Availability Zone: ap-northeast-1a
[aws-newrelic-test]  -- Keypair: vagrant
[aws-newrelic-test]  -- Security Groups: ["vagrant"]
[aws-newrelic-test]  -- Block Device Mapping: []
[aws-newrelic-test]  -- Terminate On Shutdown: false
[aws-newrelic-test]  -- Monitoring: false
[aws-newrelic-test]  -- EBS optimized: false
[aws-newrelic-test]  -- Assigning a public IP address in a VPC: false
[aws-newrelic-test] Waiting for instance to become "ready"...
[aws-newrelic-test] Waiting for SSH to become available...
[aws-newrelic-test] Machine is booted and ready for use!
[aws-newrelic-test] Running provisioner: ansible...

PLAY [all] ********************************************************************

GATHERING FACTS ***************************************************************
ok: [aws-newrelic-test]

TASK: [newrelic | check if repository is installed] ***************************

*snip*

PLAY RECAP ********************************************************************
aws-newrelic-test          : ok=9    changed=6    unreachable=0    failed=0

AWSインスタンス作成、起動、Ansible によるプロビジョニングが一気通貫で実行される。

暫くすると、New Relic の画面で EC2 サーバの情報が見られるようになった。
AWS課金には注意。


References

7.16.2013

AWS: EC2 Restore Script

AWS: EC2インスタンスをスナップショットから復元するスクリプト


スナップショットのリストアに伴う一連の操作をスクリプト化。

デバイスが EBS 1個だけの場合にのみ対応。

コード

#!/usr/bin/env python
# -*- coding: utf-8 -*-

import sys
import subprocess
import time
try:
    import json
except ImportError:
    print('You need python 2.6 or later to run this script.')
    sys.exit(1)


def usage():
    print('Usage: %s <instance-id> <snapshot-id>' % sys.argv[0])
    sys.exit(2)


def run_command(*args):
    output = subprocess.check_output(['aws', 'ec2'] + list(args))
    return json.loads(output)


def get_volume_id(instance):
    assert(len(instance['BlockDeviceMappings']) == 1)
    return instance['BlockDeviceMappings'][0]['Ebs']['VolumeId']


def get_zone(instance):
    return instance['Placement']['AvailabilityZone']


def get_device(instance):
    assert(len(instance['BlockDeviceMappings']) == 1)
    return instance['BlockDeviceMappings'][0]['DeviceName']


def is_running(instance):
    return instance['State']['Code'] == 16


def is_stopped(instance):
    return instance['State']['Code'] == 80


def get_instance(instance_id):
    j = run_command('describe-instances', '--instance-ids', instance_id)
    return j['Reservations'][0]['Instances'][0]


def start_instance(instance_id):
    sys.stdout.write('Starting instance: %s ...' % instance_id)
    run_command('start-instances', '--instance-ids', instance_id)

    for i in range(20):
        sys.stdout.write('.')
        time.sleep(10)
        if is_running(get_instance(instance_id)):
            break
    else:
        raise(RunTimeError('Timed out for waiting.'))
    print('OK')


def stop_instance(instance_id):
    sys.stdout.write('Stopping instance: %s ...' % instance_id)
    run_command('stop-instances', '--instance-ids', instance_id)

    for i in range(20):
        sys.stdout.write('.')
        time.sleep(10)
        if is_stopped(get_instance(instance_id)):
            break
    else:
        raise(RunTimeError('Timed out for waiting.'))
    print('OK')


def detach_volume(volume_id):
    sys.stdout.write('Detaching volume: %s ...' % volume_id)
    run_command('detach-volume', '--volume-id', volume_id)
    print('OK')


def create_volume(zone, snapshot):
    sys.stdout.write('Creating volume from snapshot: %s ...' % snapshot)
    j = run_command(
        'create-volume', '--availability-zone', zone,
        '--snapshot-id', snapshot)
    print('OK')
    return j['VolumeId']


def attach_volume(volume_id, instance_id, device):
    sys.stdout.write('Attaching volume: %s ...' % volume_id)
    run_command(
        'attach-volume', '--volume-id', volume_id,
        '--instance-id', instance_id, '--device', device)
    print('OK')


def delete_volume(volume_id):
    sys.stdout.write('Deleting volume: %s ...' % volume_id)
    run_command('delete-volume', '--volume-id', volume_id)
    print('OK')


if __name__ == '__main__':
    if len(sys.argv) != 3:
        usage()

    instance_id = sys.argv[1]
    snapshot = sys.argv[2]

    sys.stdout.write('Checking instance: %s ...' % instance_id)
    ins = get_instance(instance_id)

    old_vol = get_volume_id(ins)
    print('OK')

    stop_instance(instance_id)
    detach_volume(old_vol)
    new_vol = create_volume(get_zone(ins), snapshot)
    attach_volume(new_vol, instance_id, get_device(ins))
    start_instance(instance_id)
    delete_volume(old_vol)

実行例

$ ./aws_restore.py i-xxxxxxxx snap-XXXXXXXX
Checking instance: i-xxxxxxxx ...OK
Stopping instance: i-xxxxxxxx .......OK
Detaching volume: vol-yyyyyyyy ...OK
Creating volume from snapshot: snap-XXXXXXXX ...OK
Attaching volume: vol-zzzzzzzz ...OK
Starting instance: i-xxxxxxxx .....OK
Deleting volume: vol-yyyyyyyy ...OK

7.09.2013

AWS: More Listings of EC2 Information

AWS: EC2 情報の簡易一覧表示

こちらの改良版。
mog project: AWS: Brief Listing of EC2 Instances 

インスタンスの他に、ボリューム、スナップショットの一覧も表示。

#!/usr/bin/env python
# -*- coding: utf-8 -*-

import sys
import subprocess
try:
    import json
except ImportError:
    print('You need python 2.6 or later to run this script.')
    sys.exit(1)


def list_instances():
    print('Instances:')
    command_args = ['describe-instances']
    headers = [
        ('Name', 16),
        ('Instance', 16),
        ('Type', 10),
        ('Launch Time', 26),
        ('State', 12),
    ]

    def generator(output):
        for i in output['Reservations'][0]['Instances']:
            yield [
                get_name(i),
                i['InstanceId'],
                i['InstanceType'],
                i['LaunchTime'],
                i['State']['Name'],
            ]
    print_list(command_args, headers, generator)


def list_volumes():
    print('Volumes:')
    command_args = ['describe-volumes']
    headers = [
        ('Name', 16),
        ('Volume ID', 16),
        ('Cap', 8),
        ('Type', 11),
        ('Zone', 17),
        ('State', 12),
    ]

    def generator(output):
        for i in output['Volumes']:
            yield [
                get_name(i),
                i['VolumeId'],
                '%d GB' % i['Size'],
                i['VolumeType'],
                i['AvailabilityZone'],
                i['State'],
            ]
    print_list(command_args, headers, generator)


def list_snapshots():
    print('Snapshots:')
    command_args = ['describe-snapshots', '--owner-ids', 'self']
    headers = [
        ('Name', 16),
        ('Snapshot ID', 16),
        ('Cap', 8),
        ('Start Time', 28),
        ('State', 12),
    ]

    def generator(output):
        for i in output['Snapshots']:
            yield [
                get_name(i),
                i['SnapshotId'],
                '%d GB' % i['VolumeSize'],
                i['StartTime'],
                i['State'],
            ]
    print_list(command_args, headers, generator)


def get_name(obj):
    return ''.join(
        [x['Value'] for x in obj.get('Tags', []) if x['Key'] == 'Name'])


def print_list(command_args, headers, generator):
    # Print header.
    print(''.join([x[0].ljust(x[1]) for x in headers]))
    print('-' * sum([x[1] for x in headers]))

    # Run command.
    stdout = subprocess.check_output(['aws', 'ec2'] + command_args)
    output = json.loads(stdout)

    # Print result.
    for result in generator(output):
        print(''.join(
            [result[i][:x[1] - 1].ljust(x[1]) for i, x in enumerate(headers)]))

    # Print footer.
    print('')


if __name__ == '__main__':
    list_instances()
    list_volumes()
    list_snapshots()

7.07.2013

Setup Shogi-server on AWS with Fabric

AWS: shogi-server を Fabric で構築する

目的

コンピュータ将棋のネット対局用サーバ shogi-server を AWS の EC2 インスタンス上に構築する。

このとき、全ての設定作業を Fabric で完結させたい。


前提


準備するもの


iptables

shogi-server (CSAプロトコル) で使う 4081 ポートを許可、ロギング設定など。

# Firewall configuration written by system-config-firewall
# Manual customization of this file is not recommended.
*filter
:INPUT DROP [0:0]
:FORWARD DROP [0:0]
:OUTPUT ACCEPT [0:0]
-A INPUT -m state --state ESTABLISHED,RELATED -j ACCEPT
-A INPUT -p icmp -j ACCEPT
-A INPUT -i lo -j ACCEPT
-A INPUT -m state --state NEW -m tcp -p tcp --dport 22 -j ACCEPT
-A INPUT -m state --state NEW -m tcp -p tcp --dport 4081 -j ACCEPT
-N LOGGING
-A INPUT -j LOGGING
-A LOGGING -j LOG --log-level warning --log-prefix "DROP:" -m limit
-A LOGGING -j DROP
COMMIT


sudoers

sudo の際に環境変数 PATH を引き継ぐようにしないと、なぜか Ruby のインストールに失敗してしまう。
env_keep に PATH を追記した sudoers ファイルをあらかじめ用意しておく。

# diff -u ./sudoers.20130707 ./sudoers
--- ./sudoers.20130707	2013-05-10 03:53:29.636195742 +0900
+++ ./sudoers	2013-07-07 11:47:48.647961526 +0900
@@ -76,6 +76,7 @@
 Defaults    env_keep += "LC_COLLATE LC_IDENTIFICATION LC_MEASUREMENT LC_MESSAGES"
 Defaults    env_keep += "LC_MONETARY LC_NAME LC_NUMERIC LC_PAPER LC_TELEPHONE"
 Defaults    env_keep += "LC_TIME LC_ALL LANGUAGE LINGUAS _XKB_CHARSET XAUTHORITY"
+Defaults    env_keep += "PATH"
 
 #
 # Adding HOME to env_keep may enable a user to run unrestricted


起動スクリプト

shogi-server をサービスとして登録し、起動/停止を行うためのスクリプト。
/etc/init.d/shogi-server として配備。

PIDファイルを /var/run、ログを /var/log/shogi-server 配下に作成している。

サービスは専用ユーザ shogi で実行される。

#!/bin/bash
#
# Start/Stop shogi-server daemon
#
# chkconfig: 2345 85 15
# description: shogi-server daemon mode

PROC_NAME=shogi-server
PROC_USER=shogi
PROC_GROUP=shogi
PROC_BIN=/opt/shogi-server/shogi-server
PID_FILE=/var/run/shogi-server.pid
DAEMON_LOG_DIR=/var/log/shogi-server
PLAYER_LOG_DIR=$DAEMON_LOG_DIR/player-logs
CONSOLE_LOG=$DAEMON_LOG_DIR/console.log

EVENT_NAME=event1
PORT_NUMBER=4081

# Sanity checks
[ -x $PROC_BIN ] || exit 1

# Source function library & LSB routines
. /etc/rc.d/init.d/functions

RETVAL=0

start()
{
    echo -n $"Starting $PROC_NAME: "

    mkdir -p $DAEMON_LOG_DIR $PLAYER_LOG_DIR
    touch $PID_FILE
    chown $PROC_USER:$PROC_GROUP $DAEMON_LOG_DIR $PLAYER_LOG_DIR $PID_FILE

    su - $PROC_USER -c \
        "ruby $PROC_BIN --daemon $DAEMON_LOG_DIR --pid-file $PID_FILE \
        --player-log-dir $PLAYER_LOG_DIR $EVENT_NAME $PORT_NUMBER \
        > $CONSOLE_LOG 2>&1"
    RETVAL=$?
    if [ $RETVAL -eq 0 ]; then
        success
    else
        rm -f $PID_FILE
        failure
    fi
    echo
}

stop()
{
    echo -n $"Stopping $PROC_NAME:"
    if [ -f $PID_FILE ]; then
        killproc -p $PID_FILE $PROC_NAME -TERM
        rm -f $PID_FILE
    fi
    RETVAL=$?
    [ $RETVAL -eq 0 ] && success || failure
    echo
}

case "$1" in
    start)
        start
        RETVAL=$?
        ;;
    stop)
        stop
        RETVAL=$?
        ;;
    status)
        status -p $PID_FILE $PROC_BIN
        RETVAL=$?
        ;;
    restart)
        stop
        start
        ;;
    *)
        echo $"Usage: $0 {start|stop|status|restart}"
        RETVAL=2
        ;;
esac

exit $RETVAL


logrotate 定義ファイル

ログファイルの洗い替えは logrotate を利用する。
/etc/logrotate.d/shogi-server として配備。

/var/log/shogi-server/shogi-server.log
/var/log/shogi-server/player-logs/*.log {
    weekly
    rotate 4
    missingok
    notifempty
    copytruncate
    compress
}


Fabric 用スクリプト

Fabric で使う Python スクリプト。
env.hosts はハードコーディングして使ってもよい。

標準APIの put 関数にも sudo 機能があるものの、SELinux 対応やバックアップ作成などが物足りなかったので
独自の _put という関数でラップしている。

EC2 のファイアウォール設定もこのスクリプトに含めているが、分離させた方がいいかもしれない。

# -*- coding: utf-8 -*-
"""
Installing shogi-server and its dependencies.
"""

import os
import json
from fabric.api import *
from fabric.decorators import runs_once, roles, task

env.user = 'ec2-user'
# env.hosts = []
env.use_ssh_config = True

WORK_DIR = os.path.dirname(os.path.abspath(__file__))

APL_USER = 'shogi'
APL_GROUP = 'shogi'
APL_HOME = '/home/%s' % APL_USER

GIT_RBENV = 'git://github.com/sstephenson/rbenv.git'
GIT_RUBY_BUILD = 'git://github.com/sstephenson/ruby-build.git'
GIT_SHOGI_SERVER = \
    'git://git.sourceforge.jp/gitroot/shogi-server/shogi-server.git'

RUBY_VERSION = '1.9.3-p448'

EC2_SECURITY_GROUP = 'quick-start-1'


@task
def setup():
    """Setup tasks for shogi-server."""

    setup_os_user()
    setup_firewall()
    install_ruby()
    install_shogi_server()


@task
def setup_os_user():
    """Add 'shogi' user and 'shogi' group."""

    if sudo('id %s' % APL_USER, quiet=True).succeeded:
        return

    # Add user and group.
    sudo('groupadd -g 501 %s' % APL_GROUP)
    sudo('useradd -u 501 -g %s %s' % (APL_GROUP, APL_USER))

    # Copy sudoers.
    _put('%s/sudoers' % WORK_DIR, '/etc/sudoers', '440', 'root', 'root')


@task
def setup_firewall():
    """Configure linux and EC2 firewall.
        AWS CLI and its connection settings are required."""

    # Linux iptables
    _put('%s/iptables' % WORK_DIR, '/etc/sysconfig/iptables',
         '600', 'root', 'root')
    sudo('service iptables restart')

    # EC2 firewall
    port = 4081
    cidr = '0.0.0.0/0'
    old = local('aws ec2 describe-security-groups', capture=True)
    j = json.loads(old)

    found = (EC2_SECURITY_GROUP, port, cidr) in (
        (a['GroupName'], b['FromPort'], c['CidrIp'])
        for a in j['SecurityGroups']
        for b in a['IpPermissions']
        for c in b['IpRanges'])

    if not found:
        opts = '--group-name %s --ip-protocol tcp ' % EC2_SECURITY_GROUP
        opts += '--from-port %d --to-port %d --cidr-ip %s' % (port, port, cidr)
        local('aws ec2 authorize-security-group-ingress %s' % opts)


@task
def install_ruby():
    """Install git, rbenv, ruby-build and ruby."""

    # Install git.
    sudo('yum -y install git')

    # Install rbenv.
    with cd('/usr/local'):
        sudo('git clone %s %s' % (GIT_RBENV, 'rbenv'))
        sudo('mkdir rbenv/shims rbenv/versions')

    # Install ruby-build.
    with cd('/usr/local'):
        sudo('git clone %s %s' % (GIT_RUBY_BUILD, 'ruby-build'))
    with cd('/usr/local/ruby-build'):
        sudo('./install.sh')

    # Create system-level profile.
    profile = '/etc/profile.d/rbenv.sh'
    sudo("""echo 'export RBENV_ROOT="/usr/local/rbenv"' > %s""" % profile)
    sudo("""echo 'export PATH="/usr/local/rbenv/bin:$PATH"' >> %s""" % profile)
    sudo("""echo 'eval "$(rbenv init -)"' >> %s""" % profile)

    # Install requirements.
    sudo('yum -y groupinstall "Development Tools"')
    sudo('yum -y install openssl-devel readline-devel zlib-devel')

    # Install ruby.
    sudo('su - -c "rbenv install 1.9.3-p448"')
    sudo('su - -c "rbenv global 1.9.3-p448"')
    sudo('su - -c "rbenv rehash"')


@task
def install_shogi_server():
    """Install and start shogi-server as a service."""

    shogi_path = '/opt/shogi-server'

    if sudo('test -d %s' % shogi_path, quiet=True).succeeded:
        return

    # Clone from repository.
    sudo('git clone %s %s' % (GIT_SHOGI_SERVER, shogi_path))
    sudo('chown -R %s:%s %s' % (APL_USER, APL_GROUP, shogi_path))

    # Copy init script.
    _put('%s/shogi-server.init' % WORK_DIR, '/etc/init.d/shogi-server',
         '755', 'root', 'root')

    # Add and start service.
    sudo('chkconfig --add shogi-server')
    sudo('service shogi-server start')

    # Copy logrotate setting.
    _put('%s/shogi-server.logrotate' % WORK_DIR,
         '/etc/logrotate.d/shogi-server', '644', 'root', 'root')


def _put(src, dst, mode, owner, group):
    tmp = '/tmp/%s.tmp' % src.split('/')[-1]
    backup_opts = '--backup=simple --suffix=.`date +%Y%m%d`'
    permission_opts = '-m %s -o %s -g %s' % (mode, owner, group)

    put(local_path=src, remote_path=tmp)
    sudo('install %s %s %s %s' % (backup_opts, permission_opts, tmp, dst))
    sudo('rm -f %s' % tmp)


実行方法

fab コマンドで実行。Microインスタンスで20分弱で完了。

$ fab -f ./shogi-server.py --list
$ fab -f ./shogi-server.py -H 対象サーバ setup

7.02.2013

AWS: Brief Listing of EC2 Instances

AWS: EC2 インスタンスの簡易一覧表示


AWS CLI の出力結果(json)を表形式にフォーマットして見やすくしたい。


EC2 インスタンス一覧の表示

jq でやろうと思ったが断念。Python のスクリプトを書いた。 

#!/usr/bin/env python
# -*- coding: utf-8 -*-

import sys
import subprocess
try:
    import json
except ImportError:
    print('You need python 2.6 or later to run this script.')
    sys.exit(1)


def print_instances():
    headers = [
        ('Name', 24),
        ('Instance', 12),
        ('Type', 12),
        ('State', 12),
        ('LaunchTime', 24),
    ]
    print(''.join([x[0].ljust(x[1]) for x in headers]))
    print('-' * sum([x[1] for x in headers]))

    stdout = subprocess.check_output(['aws', 'ec2', 'describe-instances'])
    output = json.loads(stdout)

    for ins in output['Reservations'][0]['Instances']:
        result = [
            ''.join([x['Value'] for x in ins['Tags'] if x['Key'] == 'Name']),
            ins['InstanceId'],
            ins['InstanceType'],
            ins['State']['Name'],
            ins['LaunchTime'],
        ]
        print(''.join([result[i].ljust(x[1]) for i, x in enumerate(headers)]))

if __name__ == '__main__':
    print_instances()
  • 出力例
Name                    Instance    Type        State       LaunchTime
------------------------------------------------------------------------------------
server1                 i-00000000  t1.micro    running     2013-07-01T10:58:49.000Z
server2                 i-11111111  m1.small    stopped     2013-07-01T11:58:49.000Z
server3                 i-22222222  m1.small    stopping    2013-07-01T12:58:49.000Z
                        i-33333333  t1.micro    pending     2013-07-01T13:58:49.000Z

最終行は名前未設定のインスタンス。

6.30.2013

AWS: EC2 Settings for System Time

AWS: EC2 RHELインスタンスの時刻周りの設定

NTPの設定

ntpd が起動していなくても

/sys/devices/system/clocksource/clocksource0/current_clocksource

が 「xen」 に設定されていれば、このゲストOSはホストノードの時刻と同期されている。

つまり、初期状態で何もしなくても時刻同期は行われていると考えてよい。

タイムゾーンの設定

システムのタイムゾーンを日本時間に変えるには、/etc/localtime を書き換える必要がある。
fabric のスクリプト(かなり手抜き)で実施。

# -*- coding: utf-8 -*-
"""
Initial setup for AWS EC2.
"""

from fabric.api import local, env, cd, lcd, run, sudo, put
from fabric.decorators import runs_once, roles, task

env.use_ssh_config = True


@task
def setup():
    """Initial setup."""
    _set_timezone()


def _set_timezone():
    sudo('mv -i /etc/localtime /etc/localtime.orig')
    sudo('ln -s /usr/share/zoneinfo/Asia/Tokyo /etc/localtime')

fab コマンド投入

$ fab -f ./setup_aws.py -H ec2-user@<対象サーバ> setup

More Settings for AWS

AWS: その他の初期設定

  • EC2: Elastic IP Addresses
    EC2インスタンスを固定のグローバルIPアドレスに紐づけるサービス。
  • インスタンスイメージの作成
    AMI を作成したり、ディスクのスナップショットを取ったり。 
  • E3: Bucket の作成
  • CloudWatch
    利用料金が 1ドルを越えたらアラートメールを飛ばすよう設定 
  • Hapyrus の FryData (無料で Amazon Redshift の体験ができる) を試してみる
    Hapyrus FryData for Amazon Redshift (ベータ)


References

Settings for AWS Command Line Interface

AWS Command Line Interface (CLI) の設定

AWS CLI とは

コマンドラインから AWS の操作を行うための Python スクリプト。 
AWS Command Line Interface

前提パッケージ
  • Python 2.6 以上
  • easy_install または pip


インストール

pip でのインストール例

$ sudo pip install awscli


初期設定

  • アクセスキーの作成
    Management Console のアカウント -> Security Credentials からキーを作成。
    Screenshot 6 30 13 03 15
    ダウンロードしたファイル(rootkey.csv)に AWSAccessKeyId と AWSSecretKey が書かれている。

     
  • 設定ファイルを作る
    アクセスキーとリージョンの設定
    (Dropbox上にファイルを置く例)
    $ vi $DROPBOX_DIR/config/awscli.conf
    [default]
    aws_access_key_id=<AWSAccessKeyId>
    aws_secret_access_key=<AWSSecretKey>
    region=ap-northeast-1
    $ chmod 600 $DROPBOX_DIR/config/awscli.conf
  • ログインシェルで設定
    設定ファイルのパスとオートコンプリートの設定
    (zsh の場合の例) 
  • # Settings for Amazon Web Services CLI
    if [ -f /usr/local/bin/aws ]; then
      export AWS_CONFIG_FILE=$DROPBOX_DIR/config/awscli.conf
      source /usr/local/bin/aws_zsh_completer.sh
    fi


実行例

EC2インスタンス一覧の表示

$ aws help
$ aws ec2 help
$ aws ec2 describe-instances

結果が JSON フォーマットで返ってくる。
コマンドラインで JSON をパースできるように jq を入れると便利かも。


References


6.29.2013

Getting Started with Amazon Web Services

Amazon Web Services (AWS) を始める

Amazon Redshift が俄に盛り上がっているようで、調べてみると 2013/7/1 までAWSクラウド無料体験キャンペーン
なるものが開催中とのこと。

Screenshot 6 29 13 13 04

虹の配色が少し気持ち悪いが、これを機にアカウントを作ってみたいと思う。

AWS アカウント作成

  • AWSアカウント作成ページを開く
    https://portal.aws.amazon.com/gp/aws/developer/registration/index.html 
  • Amazon.com のIDでログイン (なければここで作成?)
  • 氏名、住所、電話番号を入力し規約同意のチェックを付ける
  • クレジットカードの番号、名義、有効期限を入力
  • 電話による身元確認
    • 電話番号を指定すると画面に4桁のPIN番号が表示
    • 直後、電話がかかってくるので、PIN番号を電話で入力し、認証完了
  • サポートプランの選択 -> 今回はBasic を選択
    • Basic (Free)
    • Developer ($49/month)
    • Business (Starting at $100/month) - Recommended
    • Enterprise (Starting at $15,000/month)
  • アカウント作成完了。Thank you メールが飛んでくる。
AWS Management Console が使えるようになった。

Screenshot 6 29 13 13 30 2

忘れずに、キャンペーンの応募もしておく。

Screenshot 6 29 13 13 33 3


Amazon EC2 インスタンス作成

説明スライド(http://www.slideshare.net/kentamagawa/3amazon-ec2)の手順に沿って実施。

  • EC2 の管理画面から Tokyo リージョンを選択し、Launch Instance ボタンを押下
  • ウィザードを選択 -> 今回は Classic Wizard
  • マシンイメージ(AMI)の選択 -> 今回は Red Hat Enterprise Linux 6.4 64bit (星印が無料枠で使用可能)
  • インスタンス詳細
    • Number of instances: 1
    • Instance Type: T1 micro (CPU: 2ECU以下 1core, メモリ: 613MB)
    • Launch into: Subnet: No Preference (default subnet in any AZ)
    • Kernel ID, RAM Disk ID: 暫くLoading表示だった後、空のリストになってしまった
    • Monitoring: とりあえずチェックなし
    • User Data: as text
    • Termination Protection: とりあえず無効のまま
    • Shutdown Behaviour: Stop
    • IAM Role: None
    • Tenancy: Default
    • Storage Device Configuration: とりあえずデフォルトのまま
    • タグ: Name だけ指定
  • キーペアの作成
    • 名前を入れてボタンを押せば、pem ファイルをダウンロードできる
  • ファイアウォールの設定
    • Security Group Name: quick-start-1
    • Inbound Rules
      • 22 (SSH) 0.0.0.0/0
      • 80 (HTTP) 0.0.0.0/0 <- 追加
  • 最後に確認画面が出て、いざLaunch!
Public DNS に対して、ssh で ec2-user でログインできた。
このユーザには、あらかじめ sudo 権限も付いている。 

pem ファイルの設定など

$ mv -i ~/Download/foo.pem ~/.ssh/
$ cd ~/.ssh
$ chmod 400 ./foo.pem
$ ssh -i ./foo.pem ec2-user@<Public DNS=インスタンスに付与されているグローバルアドレス>


References