12.03.2014

Cool Badges for GitHub Projects

GitHubで貼っておきたいバッジあれこれ


ライセンス表示

Read the Docs

Travis CI

Build Status

  • Travis CI
  • ユニットテストのホスティングサービス
  • 対応言語
    • C, C++, Clojure, Erlang, Go, Groovy, Haskell, Java, JavaScript & Node.js, Objective-C, Perl, PHP, Python, Ruby, Scala
  • オープンソースであれば無料、それ以外は月額 $129〜 の有料プランあり => Travis CI: Plans

Coveralls

Scrutinizer

  • Scrutinizer
  • ソースコードの静的解析
  • 対応言語
    • PHP, Python, Ruby (Java, Scala は検討中の模様)
  • トライアル期間14日は無料、その後、月額 $19〜 => Plans & Pricing


Related Posts

11.27.2014

Scala: error: forward reference extends over definition of value

Scala: Stream の再帰的な定義でエラー


自分自身を参照するような Stream を定義したら、エラーが出た。


エラーが発生する例

scala> def f(x: Int) = {
     |   val xs: Stream[Int] = x #:: xs.map(_ + 1)
     |   xs.tail
     | }
:17: error: forward reference extends over definition of value xs
         val xs: Stream[Int] = x #:: xs.map(_ + 1)
                                     ^


対応方法

lazy val にすれば OK。

scala> def f(x: Int) = {
     |   lazy val xs: Stream[Int] = x #:: xs.map(_ + 1)
     |   xs.tail
     | }
f: (x: Int)scala.collection.immutable.Stream[Int]

scala> f(3).take(10).toList
res8: List[Int] = List(4, 5, 6, 7, 8, 9, 10, 11, 12, 13)


References

11.25.2014

AdTech x Scala x Performance Tuning

アドテク×Scala meetup で登壇してきました


ありがたいことに、ひょんなことから声を掛けていただき、去る 11月20日
サイバーエージェント社で行われた『アドテク×Scala meetup』で少しだけお話をさせていただきました。


tl;dr


感想

  • アドテクを支えるScala - Ad Generationの場合
    • アドジェネさん、Spray/Actor ベースで動いているのかー。
  • Dynalystが広告配信で使っている技術(Spray×Akka×Kamon×Zabbix)
  • アドテク×Scala×パフォーマンスチューニング
    • 緊張しました。 200人もの大人数の前で話したのは初めてです。
    • インフラ目線の内容も織り交ぜ、自分自身が普段心がけていることをまとめました。
    • アドテク以外の開発でも参考になる部分はあると思います。
  • 軽量言語メインの 文系エンジニアだった自分が Scalaのシステム開発に携わることになった経緯
    • 馬の人だー。
  • 座談会
    • OE(@OE_uia)さん の貫禄の回し。
    • あのベテラン司会者のような落ち着きは、どこから生まれるのだろうか。
    • ご質問くださった皆様、どうもありがとうございました。


全体を通して

  • 与えられた発表時間はプレゼンに集中し、後で質問を受け付けるというスタイル。
    発表者側としてはとてもやりやすかった。
  • Spray/Actor ベースのシステム、十分に枯れてきた感がある。
    早いところプロダクションで作ってみたい。
  • 無料で振る舞われたビール & 寿司に感動。さすがサイバーエージェントさんや。
    (こちらはスタッフ & 登壇者専用) 
    Photo 2014 11 20 20 56 20 
  • 人気沸騰中の Scala ガール (AdTech Studio Girls Blog) に会えました!
  • 当日だけでなくイベントの準備に奔走されたCA社の皆様、当日ご来場くださった皆様、
    本当にありがとうございました!
    (こちらは開場前の準備風景)
    Photo 2014 11 20 18 36 53 


11.07.2014

Integrating Your Python Projects with Travis-CI and Coveralls

Python: GitHub 上のプロジェクトを Travis-CI, Coveralls と連携する


GitHub でパブリックなプロジェクトを作ったら、無料でCI環境とカバレッジ環境を手に入れることが可能。
これを利用しない手はない。

以下、具体例として一つの小さなプロジェクトを作りながら説明する。


Step 1: GitHub リポジトリ作成

setup.py で管理された Python プロジェクトを作る。

ディレクトリ構成

構成の一例。

.
├── .gitignore
├── .travis.yml
├── LICENSE
├── README.md
├── setup.py
├── src
│   └── yourpackage
│       ├── __init__.py
│       └── yourmodule.py
└── tests
    ├── __init__.py
    └── test_yourmodule.py


アプリケーション/ライブラリの実装

ソースコードは src ディレクトリ配下にまとめる。

ここでは例として yourpackage というパッケージと、適当な数値計算を行うyour_function という関数を用意した。

__init__.py にインポート対象(クラス/関数)を書くのを忘れずに。

from .yourmodule import your_function
def your_function(x):
    ret = 0
    if x % 2:
        ret |= 1
    if x < 10000:
        ret |= 2
    if x == 10000:
        ret |= 4
    if x % 9 == 7:
        ret |= 8
    if x / 2000 == 6:
        ret |= 16
    return ret
テストコードの実装

テストコードは tests ディレクトリ配下にまとめる。

tests 自体もパッケージとして管理したほうが利便性がよいので、空の __init__.py を作る。
そして以下のようなテストコードを書いた。

import unittest
from yourpackage import your_function


class TestYourModule(unittest.TestCase):
    def setUp(self):
        pass

    def test_your_function_zero(self):
        self.assertEqual(your_function(0), 2)

    def test_your_function_odd(self):
        self.assertEqual(your_function(1), 3)

    def test_your_function_greater_than_10000(self):
        self.assertEqual(your_function(10006), 8)

    def test_your_function_12345(self):
        self.assertEqual(your_function(12345), 17)

カバレッジ結果をわかりやすくするため、あえてカバレッジ率は 100% にならないようにしている。

setup.py セットアップスクリプトの記述

今回は必要ないが、他の Python ライブラリに依存があればここで記述する。

from setuptools import setup, find_packages

setup(
    name='your-project-name',
    version='0.0.1',
    description='description for your project',
    author='your name',
    author_email='your email address',
    url='your url',
    install_requires=[
        # list your dependencies
    ],
    tests_require=[
        # dependencies for unit testing
    ],
    package_dir={'': 'src'},
    packages=find_packages('src'),
    include_package_data=True,
    test_suite='tests',
)
テストの実行

setup.py を使ってテストを実行する。以下のように表示されれば OK。

$ python ./setup.py test
running test
running egg_info
creating src/your_project_name.egg-info
writing src/your_project_name.egg-info/PKG-INFO
writing top-level names to src/your_project_name.egg-info/top_level.txt
writing dependency_links to src/your_project_name.egg-info/dependency_links.txt
writing manifest file 'src/your_project_name.egg-info/SOURCES.txt'
reading manifest file 'src/your_project_name.egg-info/SOURCES.txt'
writing manifest file 'src/your_project_name.egg-info/SOURCES.txt'
running build_ext
test_your_function_12345 (tests.test_yourmodule.TestYourModule) ... ok
test_your_function_greater_than_10000 (tests.test_yourmodule.TestYourModule) ... ok
test_your_function_odd (tests.test_yourmodule.TestYourModule) ... ok
test_your_function_zero (tests.test_yourmodule.TestYourModule) ... ok

----------------------------------------------------------------------
Ran 4 tests in 0.000s

OK

ここまでできたら、一旦 GitHub に公開リポジトリとして push する。


Step 2: Travis-CI の登録

  • https://travis-ci.org/ にアクセス
  • メニュー右上の Sign in with GitHub をクリックし、GitHub OpenID認証を承認
  • ログイン後、アカウント名 -> Accounts -> Repositories の画面で
    連携したいプロジェクトをチェック・オン
    Travis CI Free Hosted Continuous Integration Platform for the Open Source Community


Step 3: Coveralls の登録

  • https://coveralls.io/ にアクセス
  • メニュー右上の SIGN IN ボタンをクリックし、GitHub OpenID認証を承認
  • ログイン後、REPOS -> ADD REPOS ボタンをクリック
  • リストに対象リポジトリが表示されていなかったら、画面上部の SYNC GITHUB REPOS ボタンをクリック
  • 連携したいプロジェクトをチェック・オン
    Coveralls Test Coverage History Statistics


Step 4: .travis.yml の設置

プロジェクトルートに、.travis.yml という名前の設定ファイルを作れば
Travis-CI がそのファイルを読み取ってテストを走らせてくれる。

こちら (Travis CI: Building a Python Project) を参考に、以下のような内容で記述。

---
language: python
python:
  - "2.6"
  - "2.7"
install:
  - pip install coveralls
script:
  - coverage run --source=src setup.py test
after_success:
  - coveralls

install, script, after_success に Coveralls 連携のための記述を追加していることに注意。

この状態で GitHub に push を行えば、ほどなく(数分以内に)自動的に Travis-CI, Coverall の処理が開始される。


Step5: 結果確認

Travis-CI, Coverall ともに GUI ですぐに結果を確認できる。
またテストに失敗した場合は、自動的に通知メールが飛んでくる。 

  • Travis-CI
    Travis CI Free Hosted Continuous Integration Platform for the Open Source Community
  • Coveralls
    Mogproject skeleton python Coveralls Test Coverage History Statistics

    ファイル単位のカバレッジももちろん閲覧可能。
    Mogproject skeleton python Job 1 src yourpackage yourmodule py Coveralls Test Coverage History Statistics


Step 6: バッジの登録

Travis-CI, Coveralls ともに公式のバッジが用意されている。

  • Travis-CI
    Travis CI Free Hosted Continuous Integration Platform for the Open Source Community
  • Coveralls
    Mogproject skeleton python Coveralls Test Coverage History Statistics 

これらを README に貼り付ければ、GitHub 訪問者にとってもステータスが一目瞭然だ。
Mogproject skeleton python 

さいごに

今回は Python プロジェクトの例を挙げたが、setup.py やテストコードの準備さえ済めば、実に簡単に連携できる。

まさに朝飯前。『Web系エンジニアにとってテストコードを書くのは朝起きて歯磨きをするように当たり前のこと』との言もあったが、これらのサービスはさながら無料の朝食サービスのようなものだ。

より高度な使い方もできるので、詳細は各サービスのドキュメントを参照。以下はその一例。

  • master 以外のブランチと連携
  • pull request との連携 (マージする前に結果を確認できるので便利)
  • 通知先の拡張 (チャットサービス等と連携)
  • プライベートリポジトリとの連携 (有償)

Travis-CI, Coveralls ともに他の言語でも利用可能なので、今後も積極的に活用していきたい。


今回使用したコード


References

11.06.2014

Cheat Sheets for My Sake

自分向け各種チートシートまとめ


自分が忘れがち or 使用頻度の高い事柄だけ書いておく。

11.05.2014

Ansible: Visualizing CloudWatch Metrics with Grafana

Ansible: Grafana で CloudWatch のメトリクスを可視化するための Playbook


tl;dr

Grafana に触れてみたいなら、まずは Grafana Play Home


目的
  • AWS CloudWatch の各種メトリクスを Grafana で見たい
  • Grafana の URL は SSL + ベーシック認証で保護したい
  • これらのセットアップ作業を Ansible で自動化したい


使ったもの
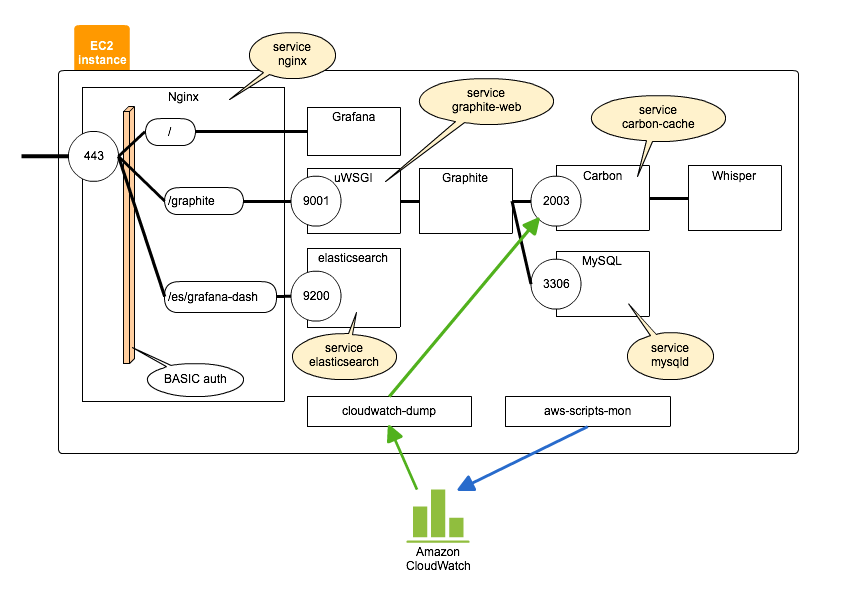
  • Amazon CloudWatch: AWS 標準の監視コンソール。メトリクスデータが蓄積している前提
  • Amazon EC2
    • Amazon Linux: インスタンスを1台立ち上げ、この中に全てをインストールする
  • Nginx: フロントエンドの Web サーバ。BASIC認証 + 自己署名証明書によるSSL通信を設定。
  • Grafana: メトリクスデータの可視化ツール
  • Graphite: メトリクスデータ管理システム
    • uWSGI: フロントエンド連携用に必要
    • MySQL: Graphite のデータストアとして使う
  • cloudwatch-dump: CloudWatch のメトリクスデータを取得し、Graphite に流し込むために使用
  • Ansible: セットアップ(プロビジョニング)の自動化


コード

こちらのリポジトリに Vagrant + Ansible コード一式と再現手順を書いた。

必要なソフトウェア/プラグインをインストール後、vagrant up を行えば以下のような Grafana の画面に触れられるようになる。

Grafana Grafana

Grafana のロゴが表示されないのは https 通信をしているためで、表示させるにはソースコードに手を入れる必要がありそう。


はじめに

システム監視の目的は大きく「異常検知」と「トレンド分析」の2つに分けられる。

また一般に、「トレンド分析」がその対象者に応じて、例えば「システム利用者向け分析」「システム管理者向け分析」「経営判断層層向け分析」の3つのように分類できると、スッキリとしたシステムになりやすい。


今回の構成ではメトリクスデータは一旦 CloudWatch に集約される想定である。

異常検知は CloudWatch が持ち合わせている Alarm 機能で対応する。
Simple Notification Service を使うことでメール送信だけではなく、携帯端末にpush通知を行ったり、特定のURLにhttpリクエストを投げたり、オートスケールを実現したりなど工夫次第でできることは多い。

次に、そのメトリクスデータを一式 Graphite に投入する。
これを Grafana のようなフロントエンドで可視化することにより、異なる対象者に向けたダッシュボードを簡単に作ることができる。
生成されたグラフを週次レポートのような形で定期的に発信するのもよい。


構成イメージ

解説


Vagrantfile
  • プラグイン dotenv を使うことでアカウント固有の定義を別ファイル(.env)に分離
  • (コスト節約のため)米国東部リージョンに t2.micro インスタンスを1個新規構築する
  • Ansible のロールの中で使う変数は、extra_vars として引き渡す
Role: aws-scripts-mon
  • これは本来監視される側のセットアップである
  • CloudWatch の標準機能だけは取得できない Linux 内部の情報(メモリ/スワップ/ディスクスペース使用状況)を CloudWatch に送信する
  • 今回は、ec2-user の ~/aws-scripts-mon ディレクトリ配下にモジュール一式を配置し、Cron で 5分おきにレポーティングが実行されるよう仕掛けた
  • CloudWatch API のアクセスには、EC2 構築時とは別の IAM ユーザ (cloudwatch) を準備した
Role: nginx
  • もちろん Grafana は Apache でも動作する(その方が簡単だ)が、今回は Web サーバとして Nginx を採用する
  • このロールの中で自己署名証明書を作成し、/etc/nginx/cert ディレクトリ配下に配置した
  • 実際のSSLサイトの設定は、Grafana のインストール後に実施する
Role: mysql
  • デフォルトの SQLite でも動作するが、運用を考えるなら MySQL 等のほうが堅い
  • Amazon Linux はデフォルトで利用可能な EPEL リポジトリに対して yum install するだけ  
Role: graphite
  • jsmartin/ansible-graphite を参考にした
  • python-carbon を yum でインストールしたのは、起動スクリプトの有り物を使いたかったので
  • 最初は graphite-web も yum で導入したのだが、/opt/graphite/bin 以下のモジュールがインストールされずエラーが出て面倒なことになったので、最終的にこちらは pip で入れることにした
  • そのため、carbon 関係はFHS準拠っぽいディレクトリ構成なのに graphite の場所は /opt/graphite 配下という状態になっている
  • コマンドによって処理の要否を判定する雛形はこちらにも書いた
  • Whisper のデフォルトのデータ間隔・保持期間を 5分・2年 に書き換えている。(storage-schemas.conf)
    こうすることで長期間の分析をしてもデータが重くならない。(逆に1分単位の分析はできなくなる)
  • 起動がうまくいかない場合は、大抵 /var/log/graphite-web.log を見れば原因がわかるはず 
Role: cloudwatch-dump
  • 自作のダンプツールを pip でインストール
  • ec2-user の ~/cloudwatch-dump ディレクトリ配下にシェルを置き、Cron で 1時間に1回(*:05)、graphite にデータを流し込む
  • 何かあった時でもデータを再投入できるよう、~/cloudwatch-dump/logs に直近のログを残している
    (ローテーションは logrotate を使ったほうが良かったかも)
  • シェルスクリプトの中で、メトリクスパス中に含まれるEC2インスタンスIDをニックネームへの変換している
Role: elasticsearch
  • RPM のダウンロード先を指定して、yum install するだけ
Role: grafana
  • Grafana 自体は独立したツールなので、インストールは素直に終わる
  • カスタマイズは config.js をテンプレートエンジンに乗せて行う。Grafana のバージョンによって微妙に項目が変わっているので注意
  • 最後に Nginx の SSL サイト設定と、BASIC認証用のファイルを作って完了
 
References

Related Posts

11.03.2014

Mac: Upgrading to OS X Yosemite

Mac: OS X Yosemite にアップグレードした際のメモ


reattach-to-user-namespace のアップデート

HomeBrew でインストールした reattach-to-user-namespace で警告が出た。

warning: reattach-to-user-namespace: unsupported new OS, trying as if it were 10.6-10.9
warning: _vprocmgr_move_subset_to_user failed
warning: reattach-to-user-namespace: unable to reattach

reattach-to-user-namespace の最新版をインストールすればよい。

$ brew upgrade reattach-to-user-namespace


テキストエディタなどで Ctrl-N (カーソルを一行下へ移動) が効かなくなる

なぜか、システム環境設定 Keyboard -> Input Sources -> Japanese -> Windows-like shortcuts に
チェックが入っていると、Emacs ライクなキーバインドである Ctrl-N が効かなくなるようだ。

チェックオフにして解決。

Screenshot 11 3 14 13 33

ハードウェアドライバの更新

11.01.2014

cloudwatch-dump - Dump All the CloudWatch Metrics Statistics

Python: CloudWatch のメトリクスデータを全て出力するスクリプト


概要

1. 特定リージョンの AWS CloudWatch からメトリクスの一覧を取得し、
2. その全てのメトリクスに対して、ある期間を一定の単位時間で「平均」「合計」の統計値を取得し、
3. その結果(メトリクス、数値、タイムスタンプ)を Graphite に投入可能な形式で出力する

そんな Python スクリプトを作成。


モチベーション

やりたいことは、CloudWatch のデータを Grafana で見たいだけ。

Grafana AWS

はじめは Fluentd + fluent-plugin-cloudwatch + fluent-plugin-graphite を使って流し込んでいたのだが、

  • メトリクスと統計方法(Average, Sum, Maximum)を1個1個指定しなければいけなかったり (将来にわたってメンテが必要)
  • ちらほらデータの欠落が見られたり
  • バッファリングの関係か、データが更新されるタイミングを制御しづらかったり
  • 特定期間だけリトライしたい場合に難しかったり
といったことがあったので、1時間おきのバッチ処理で一括インポートをすることにした。
 
とはいえ悩みどころなのが統計方法。
CloudWatch では各サービス・各メトリクスごとに推奨の(意味のある)統計方法が異なっている。

しかし今回は割り切って、全メトリクスについて 平均(Average)、合計(Sum) を取得することにした。
物によっては Maximum を得たい場合もあるが、一旦は目を瞑る。


今後の課題

  • CloudWatch の APIリクエストも決して無制限で使えるわけではないので、極力無駄なリクエストは減らしたい。
    (現時点では100万件/月まで無料, それ以降は1,000件ごとに0.01USDの課金)
    CPU使用率の Sum など、結局個別に指定する他ないのか。
  • 個別のメトリクス統計方法の指定 (DynamoDB の ItemCount の Maximum など) をできるようにするか
  • 並列化をして高速に
  • ユニットテストを充実させる


導入方法、注意事項についてはリポジトリの README参照。

10.28.2014

Python: How to Parse DateTime with Local Timezone

Python: ローカルのタイムゾーン情報付きで日時表記文字列を読み込む


Python の datetime クラスは、"naive" と "aware" の 2種類の顔を持つ。

"aware" な datetime はタイムゾーンの情報を持ち、"naive" は持たない。

プログラム内部では "aware" な datetime を利用し、"naive" は入出力境界のみにとどめるのがセオリーだ。


タイムゾーンの自動認識には、dateutil.tz.tzlocal を使うのが最も適当な様子。

たとえば datetime.strptime を使って日時を認識するコードは以下のようになる。

>>> from datetime import datetime
>>> from dateutil.tz import tzlocal
>>> t = datetime.strptime('201410281234', '%Y%m%d%H%M').replace(tzinfo=tzlocal())
>>> t
datetime.datetime(2014, 10, 28, 12, 34, tzinfo=tzlocal())

datetime#astimezone を使ってタイムゾーンを変更する。

>>> import pytz
>>> t.astimezone(pytz.utc)
datetime.datetime(2014, 10, 28, 3, 34, tzinfo=<UTC>)

epoch time への変換には一手間かかる。calendar.timegm を使うのがベストプラクティスのようだ。

>>> import calendar
>>> calendar.timegm(t.timetuple())
1414499640
>>> calendar.timegm(t.astimezone(pytz.utc).timetuple())
1414467240

10.22.2014

Ansible: Playbook for AWS CloudWatch Monitoring Scripts

Ansible: CloudWatch 用 Linux 監視スクリプトをインストールする Playbook


前提

  • EC2 インスタンスの OS は Amazon Linux とする
  • 認証情報はファイルに保存する
    • インスタンス作成前であれば、IAM Role の設定により認証情報の保持が不要となる
    • CloudWatch API 専用の IAM ユーザの作成を推奨
  • 各種パラメータについては vars/main.yml を参照
  • 課金が発生する可能性があるので注意


コード

---
- name: install additional perl modules
  yum: name={{ item }} state=present
  with_items:
    - perl-Switch
    - perl-Sys-Syslog
    - perl-LWP-Protocol-https
  tags: aws-scripts-mon

- name: check if script is installed
  command: /usr/bin/test -e {{ path_to_script }}
  ignore_errors: True
  changed_when: False
  register: is_installed
  tags: aws-scripts-mon

- name: download scripts from AWS server
  get_url: url={{ download_url }} dest={{ path_to_download }}
  when: is_installed | failed
  tags: aws-scripts-mon

- name: unzip downloaded file
  unarchive: copy=no src={{ path_to_download }} dest={{ home_dir }}
  when: is_installed | failed
  tags: aws-scripts-mon

- name: create credential file
  template: src={{ item }}.j2 dest={{ script_dir }}/{{ item }} owner={{ user }} group={{ user }} mode="0600"
  with_items:
    - awscreds.conf
  tags: aws-scripts-mon

- name: set directory owner
  file: path={{ script_dir }} state=directory owner={{ user }} group={{ user }} recurse=yes
  tags: aws-scripts-mon

- name: remove downloaded file
  file: path={{ path_to_download }} state=absent
  tags: aws-scripts-mon

- name: set cron
  cron: user={{ user }}
        state=present
        name="CloudWatch monitoring script"
        minute="{{ cron.minute }}"
        hour="{{ cron.hour }}"
        job="{{ cron.job }}"
  tags: aws-scripts-mon
AWSAccessKeyId={{ access_key }}
AWSSecretKey={{ secret_key }}
---
user: ec2-user
version: 1.1.0
filename: CloudWatchMonitoringScripts-v{{ version }}.zip
download_url: http://ec2-downloads.s3.amazonaws.com/cloudwatch-samples/{{ filename }}

path_to_download: "/tmp/{{ filename }}"

home_dir: "/home/{{ user }}"
script_dir: "{{ home_dir }}/aws-scripts-mon"
path_to_script: "{{ script_dir }}/mon-put-instance-data.pl"

access_key: "{{ aws_cloudwatch_agent_access_key_id }}"
secret_key: "{{ aws_cloudwatch_agent_secret_access_key }}"

cron:
  hour: "*"
  minute: "*/5"
  job: "{{ path_to_script }} --mem-util --mem-used --mem-avail --swap-util --swap-used --disk-path=/ --disk-space-util --disk-space-used --disk-space-avail --aws-credential-file={{ script_dir }}/awscreds.conf --from-cron"

credential 情報 (aws_cloudwatch_agent_xxx) は、extra-vars などで渡す想定。


References

10.20.2014

Scala: How to Limit DynamoDB's Range Query

Scala: AWS DynamoDB のテーブルに対して件数制限付きのレンジクエリを実行する


DynamoDB の range クエリについて、理解が足りなかったので整理しておく。

今回は例として、食事の記録を以下の項目とともに DynamoDB に格納し、
ユーザごとの最新 n 件の食事を調べるクエリを投げるようなアプリケーションを考えてみる。

DynamoDB: FoodLog
  • UserId [ハッシュキー]: ユーザID (文字列)
  • Timestamp [レンジキー]: タイムスタンプ(epoch からの経過時間をミリ秒単位で格納) (整数値)
  • Food: 食事した内容 (文字列)
  • Calorie: 摂取カロリー (整数値)


テーブル作成

aws-cli で以下のコマンドを実行し、FoodLog テーブルを作成する。
(aws-cli および認証情報はセットアップ済みの前提)

$ aws dynamodb create-table \
--table-name FoodLog \
--attribute-definitions \
AttributeName=UserId,AttributeType=S \
AttributeName=Timestamp,AttributeType=N \
--key-schema AttributeName=UserId,KeyType=HASH AttributeName=Timestamp,KeyType=RANGE \
--provisioned-throughput ReadCapacityUnits=1,WriteCapacityUnits=1


ベース部分実装

Java のライブラリと O/R マッパーを使って FoodLog クラスを実装。
接続情報は環境変数(AWS_ACCESS_KEY, AWS_SECRET_KEY)より与えられる想定である。

package com.github.mogproject.example.dynamodb

import com.amazonaws.auth.BasicAWSCredentials
import com.amazonaws.regions.RegionUtils
import com.amazonaws.services.dynamodbv2.AmazonDynamoDBClient
import com.amazonaws.services.dynamodbv2.datamodeling._

import scala.annotation.meta.beanGetter
import scala.beans.BeanProperty
import scala.collection.JavaConverters._

trait DynamoDBClient {
  private[this] val accessKeyId = sys.env("AWS_ACCESS_KEY")
  private[this] val secretAccessKey = sys.env("AWS_SECRET_KEY")
  private[this] val region = RegionUtils.getRegion("ap-northeast-1")
  private[this] val endpoint = region.getServiceEndpoint("dynamodb")

  private[this] val credentials = new BasicAWSCredentials(accessKeyId, secretAccessKey)
  private[this] val client = {
    val ret = new AmazonDynamoDBClient(credentials)
    ret.setRegion(region)
    ret.setEndpoint(endpoint)
    ret
  }
  protected val mapper = new DynamoDBMapper(client)

  def batchSave(xs: FoodLog*) = mapper.batchSave(xs.asJava)

  def batchDelete(xs: FoodLog*) = mapper.batchDelete(xs.asJava)

  def batchWrite(toWrite: Seq[FoodLog], toDelete: Seq[FoodLog]) = mapper.batchWrite(toWrite.asJava, toDelete.asJava)
}

@DynamoDBTable(tableName = "FoodLog")
case class FoodLog(
                    @(DynamoDBHashKey@beanGetter)(attributeName = "UserId") @BeanProperty var userId: String,
                    @(DynamoDBRangeKey@beanGetter)(attributeName = "Timestamp") @BeanProperty var timestamp: Long,
                    @DynamoDBAttribute(attributeName = "Food") @BeanProperty var food: String,
                    @DynamoDBAttribute(attributeName = "Calorie") @BeanProperty var calorie: Int
                    ) {
  def this() = this(null, 0, null, 0)
}

object FoodLog extends DynamoDBClient {
  def readRecent(userId: String, limit: Int): Seq[FoodLog] = ???
}


テストデータ投入

REPL を使い、2ユーザx10件ずつのランダムなテストデータを投入する。

$ export AWS_ACCESS_KEY="xxxxxx"
$ export AWS_SECRET_KEY="xxxxxx"
$ sbt console

scala> import com.github.mogproject.example.dynamodb.FoodLog
import com.github.mogproject.example.dynamodb.FoodLog

scala> import scala.util.Random
import scala.util.Random

scala> val item1 = (1 to 10).map(i => FoodLog("user-1", Random.nextInt(100000), s"food-$i", Random.nextInt(2000)))
item1: scala.collection.immutable.IndexedSeq[com.github.mogproject.example.dynamodb.FoodLog] = Vector(FoodLog(user-1,78548,food-1,1911), FoodLog(user-1,67632,food-2,974), FoodLog(user-1,34756,food-3,1639), FoodLog(user-1,15595,food-4,937), FoodLog(user-1,77366,food-5,158), FoodLog(user-1,9615,food-6,393), FoodLog(user-1,64601,food-7,429), FoodLog(user-1,6847,food-8,1834), FoodLog(user-1,55271,food-9,1434), FoodLog(user-1,74394,food-10,885))

scala> val item2 = (1 to 10).map(i => FoodLog("user-2", Random.nextInt(100000), s"food-$i", Random.nextInt(2000)))
item2: scala.collection.>immutable.IndexedSeq[com.github.mogproject.example.dynamodb.FoodLog] = Vector(FoodLog(user-2,15618,food-1,1356), FoodLog(user-2,27456,food-2,123), FoodLog(user-2,62137,food-3,1122), FoodLog(user-2,43501,food-4,673), FoodLog(user-2,80906,food-5,577), FoodLog(user-2,96682,food-6,1112), FoodLog(user-2,40193,food-7,1961), FoodLog(user-2,44857,food-8,1064), FoodLog(user-2,88767,food-9,1618), FoodLog(user-2,42126,food-10,761))

scala> FoodLog.batchSave(item1 ++ item2: _*)
res0: java.util.List[com.amazonaws.services.dynamodbv2.datamodeling.DynamoDBMapper.FailedBatch] = []


クエリ部分(仮)実装

件数制限付きのクエリを素直に書くと、以下のようになる。

  def readRecent(userId: String, limit: Int): Seq[FoodLog] = {
    val query = new DynamoDBQueryExpression[FoodLog]()
      .withHashKeyValues(FoodLog(userId, 0, null, 0))
      .withScanIndexForward(false)
      .withLimit(limit)
      .withConsistentRead(false)
    mapper.query(classOf[FoodLog], query).asScala
  }

そして limit=5 としてクエリを実行すると、結果は …… 10個ある!?

$ sbt console
scala> import com.github.mogproject.example.dynamodb.FoodLog
import com.github.mogproject.example.dynamodb.FoodLog

scala> FoodLog.readRecent("user-1", 5)
res0: Seq[com.github.mogproject.example.dynamodb.FoodLog] = Buffer(FoodLog(user-1,78548,food-1,1911), FoodLog(user-1,77366,food-5,158), FoodLog(user-1,74394,food-10,885), FoodLog(user-1,67632,food-2,974), FoodLog(user-1,64601,food-7,429), FoodLog(user-1,55271,food-9,1434), FoodLog(user-1,34756,food-3,1639), FoodLog(user-1,15595,food-4,937), FoodLog(user-1,9615,food-6,393), FoodLog(user-1,6847,food-8,1834))

scala> res0.size
res1: Int = 10

scala> res0 foreach println
FoodLog(user-1,78548,food-1,1911)
FoodLog(user-1,77366,food-5,158)
FoodLog(user-1,74394,food-10,885)
FoodLog(user-1,67632,food-2,974)
FoodLog(user-1,64601,food-7,429)
FoodLog(user-1,55271,food-9,1434)
FoodLog(user-1,34756,food-3,1639)
FoodLog(user-1,15595,food-4,937)
FoodLog(user-1,9615,food-6,393)
FoodLog(user-1,6847,food-8,1834)


これはどういうことなのか

sbt run で実行可能なプログラムを作成し、build.sbt に以下の記述を行って http-wire ログを出力してみる。

javaOptions in run ++= Seq(
  "-Dorg.apache.commons.logging.Log=org.apache.commons.logging.impl.SimpleLog",
  "-Dorg.apache.commons.logging.simplelog.showdatetime=true",
  "-Dorg.apache.commons.logging.simplelog.log.org.apache.http.wire=DEBUG"
)

fork in run := true

すると、以下のように DynamoDB との通信が 2回発生していることがわかる。

[error] 2014/10/20 01:09:19:440 JST [DEBUG] wire - >> "POST / HTTP/1.1[\r][\n]"
[error] 2014/10/20 01:09:19:441 JST [DEBUG] wire - >> "Host: dynamodb.ap-northeast-1.amazonaws.com[\r][\n]"
(snip)
[error] 2014/10/20 01:09:19:442 JST [DEBUG] wire - >> "{"TableName":"FoodLog","Limit":5,"ConsistentRead":false,"KeyConditions":{"UserId":{"AttributeValueList":[{"S":"user-1"}],"ComparisonOperator":"EQ"}},"ScanIndexForward":false}"
[error] 2014/10/20 01:09:19:468 JST [DEBUG] wire - << "HTTP/1.1 200 OK[\r][\n]"
(snip)
[error] 2014/10/20 01:09:19:478 JST [DEBUG] wire - << "{"Count":5,"Items":[{"UserId":{"S":"user-1"},"Timestamp":{"N":"78548"},"food":{"S":"food-1"},"calorie":{"N":"1911"}},{"UserId":{"S":"user-1"},"Timestamp":{"N":"77366"},"food":{"S":"food-5"},"calorie":{"N":"158"}},{"UserId":{"S":"user-1"},"Timestamp":{"N":"74394"},"food":{"S":"food-10"},"calorie":{"N":"885"}},{"UserId":{"S":"user-1"},"Timestamp":{"N":"67632"},"food":{"S":"food-2"},"calorie":{"N":"974"}},{"UserId":{"S":"user-1"},"Timestamp":{"N":"64601"},"food":{"S":"food-7"},"calorie":{"N":"429"}}],"LastEvaluatedKey":{"Timestamp":{"N":"64601"},"UserId":{"S":"user-1"}},"ScannedCount":5}"
[info] FoodLog(user-1,78548,food-1,1911)
[info] FoodLog(user-1,77366,food-5,158)
[info] FoodLog(user-1,74394,food-10,885)
[info] FoodLog(user-1,67632,food-2,974)
[info] FoodLog(user-1,64601,food-7,429)
[error] 2014/10/20 01:09:19:504 JST [DEBUG] wire - >> "POST / HTTP/1.1[\r][\n]"
[error] 2014/10/20 01:09:19:504 JST [DEBUG] wire - >> "Host: dynamodb.ap-northeast-1.amazonaws.com[\r][\n]"
(snip)
[error] 2014/10/20 01:09:19:505 JST [DEBUG] wire - >> "{"TableName":"FoodLog","Limit":5,"ConsistentRead":false,"KeyConditions":{"UserId":{"AttributeValueList":[{"S":"user-1"}],"ComparisonOperator":"EQ"}},"ScanIndexForward":false,"ExclusiveStartKey":{"UserId":{"S":"user-1"},"Timestamp":{"N":"64601"}}}"
[error] 2014/10/20 01:09:19:533 JST [DEBUG] wire - << "HTTP/1.1 200 OK[\r][\n]"
(snip)
[error] 2014/10/20 01:09:19:533 JST [DEBUG] wire - << "{"Count":5,"Items":[{"UserId":{"S":"user-1"},"Timestamp":{"N":"55271"},"food":{"S":"food-9"},"calorie":{"N":"1434"}},{"UserId":{"S":"user-1"},"Timestamp":{"N":"34756"},"food":{"S":"food-3"},"calorie":{"N":"1639"}},{"UserId":{"S":"user-1"},"Timestamp":{"N":"15595"},"food":{"S":"food-4"},"calorie":{"N":"937"}},{"UserId":{"S":"user-1"},"Timestamp":{"N":"9615"},"food":{"S":"food-6"},"calorie":{"N":"393"}},{"UserId":{"S":"user-1"},"Timestamp":{"N":"6847"},"food":{"S":"food-8"},"calorie":{"N":"1834"}}],"ScannedCount":5}"
[info] FoodLog(user-1,55271,food-9,1434)
[info] FoodLog(user-1,34756,food-3,1639)
[info] FoodLog(user-1,15595,food-4,937)
[info] FoodLog(user-1,9615,food-6,393)
[info] FoodLog(user-1,6847,food-8,1834)

改めてAPIマニュアル(DynamoDBQueryExpression (AWS SDK for Java - 1.9.1))を読む。

Sets the maximum number of items to retrieve in each service request to DynamoDB and returns a pointer to this object for method-chaining.

Note that when calling DynamoDBMapper.query, multiple requests are made to DynamoDB if needed to retrieve the entire result set. Setting this will limit the number of items retrieved by each request, NOT the total number of results that will be retrieved. Use DynamoDBMapper.queryPage to retrieve a single page of items from DynamoDB.

つまるところ、withLimit で指定しているのはクエリ全体の取得件数ではなく、
1回のリクエストで取得するサイズ (サービスリクエストにおける1ページのサイズ) なのである。

DynamoDBMapper.query メソッドは(ページ単位で遅延評価となる)全体の結果セットを返すため、
その結果に map や size などの横断的な処理を適用すると結果セット全体がスキャンされてしまう。

求める結果が最初のページだけでよければ、DynamoDBMapper.queryPage を利用するのが正解だ。


クエリ部分の正しい実装

ハイライト部分を修正。

  def readRecent(userId: String, limit: Int): Seq[FoodLog] = {
    val query = new DynamoDBQueryExpression[FoodLog]()
      .withHashKeyValues(FoodLog(userId, 0, null, 0))
      .withScanIndexForward(false)
      .withLimit(limit)
      .withConsistentRead(false)
    mapper.queryPage(classOf[FoodLog], query).getResults.asScala
  }

結果は想定通り、5個のみとなった。

scala> import com.github.mogproject.example.dynamodb.FoodLog
import com.github.mogproject.example.dynamodb.FoodLog

scala> FoodLog.readRecent("user-1", 5)
res0: Seq[com.github.mogproject.example.dynamodb.FoodLog] = Buffer(FoodLog(user-1,78548,food-1,1911), FoodLog(user-1,77366,food-5,158), FoodLog(user-1,74394,food-10,885), FoodLog(user-1,67632,food-2,974), FoodLog(user-1,64601,food-7,429))

scala> res0.size
res1: Int = 5

scala> res0 foreach println
FoodLog(user-1,78548,food-1,1911)
FoodLog(user-1,77366,food-5,158)
FoodLog(user-1,74394,food-10,885)
FoodLog(user-1,67632,food-2,974)
FoodLog(user-1,64601,food-7,429)

DynamoDBのスキャンが想定外に繰り返されると、応答が遅くなるだけでなく
読み込みキャパシティの限界突破のリスクも非常に高くなる。
このような落とし穴にはよくよく注意が必要である。


さいごに、簡単なベンチマークを行った。

100件のデータを用意し、「limit=5 の全ページスキャン」「limit=5 の最初のページのみスキャン」「limit=100 の最初のページのみスキャン」の所要時間を測定したところ、結果は以下のようになった。

  • limit=5 の全ページスキャン                    : 340msec
  • limit=5 の最初のページのみスキャン      :  19msec
  • limit=100 の最初のページのみスキャン  :  28msec

やはり、DynamoDBに対してHTTP通信を繰り返す(上記の例では20回)のは非常にコストが高い。
全ページのスキャンを行うくらいなら、最初から limit を引き上げたほうが得策だろう。


Source code


References

10.19.2014

Scala: Property-Based Testing with ScalaTest and ScalaCheck

Scala: ScalaTest + ScalaCheck を使ってプロパティベースのユニットテストを行う

  • ScalaTest とは
    多くの Scala プロジェクトで採用されているユニットテスト・フレームワークのデファクトの一つ。
    双璧をなす Specs2 とどちらを使うかは好みの問題。
  • ScalaCheck とは
    Haskell の QuickCheck から派生したツール。
    実行時にランダムな入力を自動的に生成し、振る舞いをテストすることができる。
    テスト仕様とテストデータを分離できるようになるのが嬉しい。
    ScalaTest/Specs2 には ScalaCheck を透過的に扱うための仕組みが標準で組み込まれている。


sbt の設定

ScalaTest/ScalaCheck を使うにはsbt プロジェクトを作るのが一番簡便だろう。

build.sbt などに、以下のように依存ライブラリを追加する。

libraryDependencies ++= Seq(
  "org.scalatest" %% "scalatest" % "2.2.0" % "test",
  "org.scalacheck" %% "scalacheck" % "1.11.6" % "test"
)


REPL で ScalaCheck を試す

sbt test:console で REPL を立ち上げれば、すぐに ScalaCheck の動作に触れることができる。

はじめての ScalaCheck

任意のInt型整数に対して、2 を掛けるのと自分自身を足し合わせた結果が同じになることを確かめる。
ランダムな入力 100個に対するテストが行われ、結果「OK」が表示される。

scala> import org.scalacheck.Prop.forAll
import org.scalacheck.Prop.forAll

scala> val prop = forAll { x: Int => x * 2 == x + x }
prop: org.scalacheck.Prop = Prop

scala> prop.check
+ OK, passed 100 tests.

テストに失敗する例。x * 2 でオーバーフローする場合、その値を 2 で割っても x には戻らない。

scala> val prop = forAll { x: Int => x * 2 / 2 == x }

scala> prop.check
! Falsified after 4 passed tests.
> ARG_0: 1073741824
> ARG_0_ORIGINAL: 1461275699

Int 以外の組み込み型も、そのまま直感的に扱える。

scala> val prop =
     |   forAll { (x: String, y: String, n: Int) => (x + y).startsWith(x.take(n)) }
prop: org.scalacheck.Prop = Prop

scala> prop.check
+ OK, passed 100 tests.

scala> val prop =
     |   forAll { xss: List[List[Int]] => xss.map(_.length).sum == xss.flatten.length }
prop: org.scalacheck.Prop = Prop

scala> prop.check

OK, passed 100 tests.

ランダムに生成される String や List の長さ(サイズ)は、デフォルトでは 0以上 100以下となる。


入力値の制約

入力に対して制約を与えるには、以下2種類の方法がある。

1. ジェネレータ(Gen)を与える

scala> import org.scalacheck.Gen
import org.scalacheck.Gen

scala> val prop = forAll(Gen.choose(-10000, 10000)){ x: Int => x * 2 / 2 == x }
prop: org.scalacheck.Prop = Prop

scala> prop.check
+ OK, passed 100 tests.

2. テストの内部でフィルタリングする (マッチしない場合のテストを放棄)

scala> import org.scalacheck.Prop.BooleanOperators
import org.scalacheck.Prop.BooleanOperators

scala> val prop = forAll{ x: Int => (-10000 <= x && x <= 10000) ==> (x * 2 / 2 == x) }
prop: org.scalacheck.Prop = Prop

scala> prop.check
+ OK, passed 100 tests.

ただし後者の場合、制約が強すぎるとテストが全く行われない可能性があるので注意。

scala> val prop = forAll{ x: Int => (x == 12345) ==> (x * 2 / 2 == x) }
prop: org.scalacheck.Prop = Prop

scala> prop.check
! Gave up after only 0 passed tests. 101 tests were discarded.


ScalaTest の一部として ScalaCheck を使う

BDD スタイルの FlatSpec を使う場合の例。

単純なテストであれば、org.scalatest.prop.Checkers.check を使うだけでよい。

import org.scalatest.prop.Checkers.check
import org.scalatest.{MustMatchers, FlatSpec}

class ExampleSpec extends FlatSpec with MustMatchers {
  "multiplying integer with two" should "be same as adding itself" in check { x: Int =>
    x * 2 == x + x
  }
}

sbt test を流せば以下のような結果が表示される。

[info] ExampleSpec:
[info] multiplying integer with two
[info] - should be same as adding itself

GeneratorDrivenPropertyChecks トレイトをミックスインすれば、より複雑なテストケースを書けるようになる。

例えばこのような平面座標の距離を求める簡単な関数に対して、

case class Coord(x: Double, y: Double) {
  def distance(c: Coord) = math.sqrt(math.pow(c.x - x, 2) + math.pow(c.y - y, 2))
}

ScalaCheck を使ってみる。

import org.scalatest.prop.GeneratorDrivenPropertyChecks
import org.scalatest.{MustMatchers, FlatSpec}

class CoordSpec extends FlatSpec with MustMatchers with GeneratorDrivenPropertyChecks {
  "Coord#distance" should "be same as norm when one side is origin" in forAll { (x: Double, y: Double) =>
    val norm = math.sqrt(x * x + y * y)
    Coord(x, y).distance(Coord(0, 0)) mustBe norm
    Coord(0, 0).distance(Coord(x, y)) mustBe norm
  }
}


独自のクラスに対してテストを行う

組み込み型以外のクラスを任意に生成するには、独自のジェネレータを作ればよい。

ジェネレータの実装例

  def genCoord: Gen[Coord] =
    for {
      x <- Gen.choose(-100.0, 100.0)
      y <- Gen.choose(-100.0, 100.0)
    } yield Coord(x, y)

Gen.choose, Gen.oneOf, Gen.someOf がよく使われる。
Gen.frequency で出現頻度を調整したり、Gen.suchThat で制約を付けたり
org.scalacheck.Arbitrary.arbitrary で任意の値を選んだりもできる。(参考: User Guide · rickynils/scalacheck Wiki)

テストコードはこのような形になった。

import org.scalacheck.Gen
import org.scalacheck.Arbitrary.arbitrary
import org.scalatest.prop.GeneratorDrivenPropertyChecks
import org.scalatest.{MustMatchers, FlatSpec}

class CoordSpec extends FlatSpec with MustMatchers with GeneratorDrivenPropertyChecks {
  def genCoord: Gen[Coord] =
    for {
      x <- Gen.choose(-100.0, 100.0)
      y <- Gen.choose(-100.0, 100.0)
    } yield Coord(x, y)

  "Coord#distance" should "be norm when one side is origin" in forAll { (x: Double, y: Double) =>
    val norm = math.sqrt(x * x + y * y)
    Coord(x, y).distance(Coord(0, 0)) mustBe norm
    Coord(0, 0).distance(Coord(x, y)) mustBe norm
  }

  it should "be zero with same coordinates" in forAll(genCoord) { (a: Coord) =>
    a.distance(a) mustBe 0.0
  }
  it should "be positive or zero" in forAll(genCoord, genCoord) { (a: Coord, b: Coord) =>
    a.distance(b) must be >= 0.0
  }
  it should "be less than 300" in forAll(genCoord, genCoord) { (a: Coord, b: Coord) =>
    a.distance(b) must be < 300.0
  }
  it should "not change after swapping parameters" in forAll(genCoord, genCoord) { (a: Coord, b: Coord) =>
    a.distance(b) mustBe b.distance(a)
  }
  it should "not change after parallel shift" in forAll(
    genCoord, genCoord, Gen.choose(-100.0, 100.0), arbitrary[Int], minSuccessful(500), maxDiscarded(2000)) {

    (a: Coord, b: Coord, dx: Double, dy: Int) => whenever(-10000 <= dy && dy <= 10000) {
      a.distance(b) mustBe (Coord(a.x + dx, a.y + dy).distance(Coord(b.x + dx, b.y + dy)) +- 1.0E-8)
    }
  }
}

最後の例は、whenever で入力を制限したり、+- を使うことで浮動小数点数の誤差を吸収している。


Source code


References
10.07.2014

Counting Number of Trailing Zeros in Scala

Scala: 末尾から続く0の個数を数える


与えられた64ビット整数値に対して、それを2進数にしたときに末尾から0が何個連続するかを求めたい。

たとえば十進数 88 の場合、2進数にすると 1011000 となるので、答えは 3 となる。

これは、ntz (number of trailing zeros) として知られる典型的なビット操作の問題である。


今回はそれを Scala で解くコードをいくつか準備し、その性能を比較してみた。


環境

  • CPU: 1.8 GHz Intel Core i5
  • OS: Mac OS X 10.9.4
  • Scala: 2.11.2
  • sbt: 0.13.5
  • sbt-jmh: 0.1.6


Scala での実装


1ビットずつシフトして数える

いかにもコストが重そうだが、find を使って最初にビットの立った位置を探す方法。
x は負数をとることもあるので、符号なしの右シフト(>>>)が必要な点に注意。

  def ntzNaive(x: Long): Int =
    (0 until 64).find(i => ((x >>> i) & 1L) != 0L).getOrElse(64)

var を使って工夫 (2種類)

  def ntzLoop1(x: Long): Int = {
    var y = ~x & (x - 1)
    var n = 0
    while (y != 0) {n += 1; y >>>= 1}
    n
  }

  def ntzLoop2(x: Long): Int = {
    var y = x
    var n = 64
    while (y != 0) {n -= 1; y <<= 1}
    n
  }
二分探索木を用いた方法 (3種類)
  def ntzBinarySearch1(x: Long): Int = {
    if (x == 0L) {
      64
    } else {
      var n = 1
      var y = x
      if ((y & 0x00000000ffffffffL) == 0L) {n += 32; y >>>= 32}
      if ((y & 0x000000000000ffffL) == 0L) {n += 16; y >>>= 16}
      if ((y & 0x00000000000000ffL) == 0L) {n += 8; y >>>= 8}
      if ((y & 0x000000000000000fL) == 0L) {n += 4; y >>>= 4}
      if ((y & 0x0000000000000003L) == 0L) {n += 2; y >>>= 2}
      n - (y & 1L).toInt
    }
  }

  def ntzBinarySearch2(x: Long): Int = {
    if (x == 0L) {
      64
    } else {
      var n = 63
      var y = 0L
      var z = x << 32; if (z != 0) {n -= 32; y = z}
      z = y << 16; if (z != 0) {n -= 16; y = z}
      z = y << 8; if (z != 0) {n -= 8; y = z}
      z = y << 4; if (z != 0) {n -= 4; y = z}
      z = y << 2; if (z != 0) {n -= 2; y = z}
      z = y << 1; if (z != 0) n -= 1
      n
    }
  }

  def ntzBinarySearch3(x: Long): Int = {
    if (x == 0L)
      64
    else
      if ((x & 0xffffffffL) != 0L)
        if ((x & 0xffffL) != 0L)
          if ((x & 0xffL) != 0L)
            if ((x & 0xfL) != 0L)
              if ((x & 3L) != 0L)
                if ((x & 1L) != 0L) 0 else 1
              else
                if ((x & 4L) != 0L) 2 else 3
            else
              if ((x & 0x30L) != 0L)
                if ((x & 0x10L) != 0L) 4 else 5
              else
                if ((x & 0x40L) != 0L) 6 else 7
          else
            if ((x & 0xf00L) != 0L)
              if ((x & 0x300L) != 0L)
                if ((x & 0x100L) != 0L) 8 else 9
              else
                if ((x & 0x400L) != 0L) 10 else 11
            else
              if ((x & 0x3000L) != 0L)
                if ((x & 0x1000L) != 0L) 12 else 13
              else
                if ((x & 0x4000L) != 0L) 14 else 15
        else
          if ((x & 0xff0000L) != 0L)
            if ((x & 0xf0000L) != 0L)
              if ((x & 30000L) != 0L)
                if ((x & 10000L) != 0L) 16 else 17
              else
                if ((x & 40000L) != 0L) 18 else 19
            else
              if ((x & 0x300000L) != 0L)
                if ((x & 0x100000L) != 0L) 20 else 21
              else
                if ((x & 0x400000L) != 0L) 22 else 23
          else
            if ((x & 0xf000000L) != 0L)
              if ((x & 0x3000000L) != 0L)
                if ((x & 0x1000000L) != 0L) 24 else 25
              else
                if ((x & 0x4000000L) != 0L) 26 else 27
            else
              if ((x & 0x30000000L) != 0L)
                if ((x & 0x10000000L) != 0L) 28 else 29
              else
                if ((x & 0x40000000L) != 0L) 30 else 31
      else
        if ((x & 0xffff00000000L) != 0L)
          if ((x & 0xff00000000L) != 0L)
            if ((x & 0xf00000000L) != 0L)
              if ((x & 0x300000000L) != 0L)
                if ((x & 0x100000000L) != 0L) 32 else 33
              else
                if ((x & 0x400000000L) != 0L) 34 else 35
            else
              if ((x & 0x3000000000L) != 0L)
                if ((x & 0x1000000000L) != 0L) 36 else 37
              else
                if ((x & 0x4000000000L) != 0L) 38 else 39
          else
            if ((x & 0xf0000000000L) != 0L)
              if ((x & 0x30000000000L) != 0L)
                if ((x & 0x10000000000L) != 0L) 40 else 41
              else
                if ((x & 0x40000000000L) != 0L) 42 else 43
            else
              if ((x & 0x300000000000L) != 0L)
                if ((x & 0x100000000000L) != 0L) 44 else 45
              else
                if ((x & 0x400000000000L) != 0L) 46 else 47
        else
          if ((x & 0xff000000000000L) != 0L)
            if ((x & 0xf000000000000L) != 0L)
              if ((x & 3000000000000L) != 0L)
                if ((x & 1000000000000L) != 0L) 48 else 49
              else
                if ((x & 4000000000000L) != 0L) 50 else 51
            else
              if ((x & 0x30000000000000L) != 0L)
                if ((x & 0x10000000000000L) != 0L) 52 else 53
              else
                if ((x & 0x40000000000000L) != 0L) 54 else 55
          else
            if ((x & 0xf00000000000000L) != 0L)
              if ((x & 0x300000000000000L) != 0L)
                if ((x & 0x100000000000000L) != 0L) 56 else 57
              else
                if ((x & 0x400000000000000L) != 0L) 58 else 59
            else
              if ((x & 0x3000000000000000L) != 0L)
                if ((x & 0x1000000000000000L) != 0L) 60 else 61
              else
                if ((x & 0x4000000000000000L) != 0L) 62 else 63
  }
対数計算を利用
  private[this] val ln2 = math.log(2)

  def ntzLogarithm(x: Long): Int =
    if (x == 0L)
      64
    else if (x == 0x8000000000000000L)
      63
    else
      (math.log(x & -x) / ln2).toInt
ハッシュを利用 (黒魔術)
  private[this] val ntzHash = 0x03F566ED27179461L
  private[this] lazy val ntzTable: Array[Int] =
    (0 until 64).map(i => (ntzHash << i >>> 58).toInt -> i).sorted.map(_._2).toArray

  def ntzHash(x: Long): Int =
    if (x != 0L) ntzTable((((x & -x) * ntzHash) >>> 58).toInt) else 64


ネイティブでの実装

C++ のインラインアセンブリを使って x86-64の命令を直接呼び出す。
それを JNI/JNA でラップして Scala から呼び出した。

JNI (Java Native Interface)
  • C++ コード
#include <jni.h>

extern "C" JNIEXPORT jint JNICALL Java_com_github_mogproject_util_BitOperation_ntzJni
  (JNIEnv *env, jobject obj, jlong x) {
  if (x == 0) return 64;
  int pos = 0;
  __asm__(
    "bsf %1,%q0;"
    :"=r"(pos)
    :"rm"(x));
  return pos;
}
  • ビルド
$ g++ -dynamiclib -O3 \
-I/usr/include -I$JAVA_HOME/include -I$JAVA_HOME/include/darwin \
bitops_jni.cpp -o libbitops_jni.dylib
  • Scala コード
package com.github.mogproject.util

class BitOperation {
  @native def ntzJni(x: Long): Int
}

object BitOperation {
  System.load("/path/to/libbitops_jni.dylib")

  private[this] val bitop = new BitOperation

  def ntzJni(x: => Long) = bitop.ntzJni(x)
}
JNA (Java Native Access)
  • C++ コード
extern "C" int ntz(unsigned long long x) {
  if (x == 0) return 64;
  int pos = 0;
  __asm__(
    "bsf %1,%q0;"
    :"=r"(pos)
    :"rm"(x));
  return pos;
}
  • ビルド
$ g++ -dynamiclib -O3 bitops_jna.cpp -o libbitops_jna.dylib
  • Scala コード
  private[this] val lib =
    com.sun.jna.NativeLibrary.getInstance("/path/to/libbitops_jna.dylib")

  private[this] val func = lib.getFunction("ntz")

  def ntzJna(x: Long): Int = func.invokeInt(Array(x.asInstanceOf[Object]))


テスト

とりあえず REPL でランダムなLong型整数を与え、全てのメソッドの結果が一致することを確認。

scala> import com.github.mogproject.util.BitOperation._
import com.github.mogproject.util.BitOperation._

scala> def f(x: Long) = Seq(ntzNaive(x), ntzLoop1(x), ntzLoop2(x),
     | ntzBinarySearch1(x), ntzBinarySearch2(x), ntzBinarySearch3(x), ntzLogarithm(x),
     | ntzHash(x), ntzJni(x), ntzJna(x))
f: (x: Long)Seq[Int]

scala> f(0)
res0: Seq[Int] = List(64, 64, 64, 64, 64, 64, 64, 64, 64, 64)

scala> f(-1)
res1: Seq[Int] = List(0, 0, 0, 0, 0, 0, 0, 0, 0, 0)

scala> f(0x8000000000000000L)
res2: Seq[Int] = List(63, 63, 63, 63, 63, 63, 63, 63, 63, 63)

scala> Seq.fill(1000)(scala.util.Random.nextLong) forall (f(_).toSet.size == 1)
res3: Boolean = true


ベンチマーク

sbt-jmh でベンチマークを取る。

import com.github.mogproject.util.BitOperation
import org.openjdk.jmh.annotations.{Benchmark, Scope, State => JmhState}

import scala.util.Random


@JmhState(Scope.Thread)
class BitOperationBench {
  val random = new Random(12345)

  @Benchmark def ntzNaive(): Unit = BitOperation.ntzNaive(random.nextLong())

  @Benchmark def ntzLoop1(): Unit = BitOperation.ntzLoop1(random.nextLong())
  @Benchmark def ntzLoop2(): Unit = BitOperation.ntzLoop2(random.nextLong())

  @Benchmark def ntzBinarySearch1(): Unit = BitOperation.ntzBinarySearch1(random.nextLong())
  @Benchmark def ntzBinarySearch2(): Unit = BitOperation.ntzBinarySearch2(random.nextLong())
  @Benchmark def ntzBinarySearch3(): Unit = BitOperation.ntzBinarySearch3(random.nextLong())

  @Benchmark def ntzLogarithm(): Unit = BitOperation.ntzLogarithm(random.nextLong())
  @Benchmark def ntzHash(): Unit = BitOperation.ntzHash(random.nextLong())

  @Benchmark def ntzJni(): Unit = BitOperation.ntzJni(random.nextLong())
  @Benchmark def ntzJna(): Unit = BitOperation.ntzJna(random.nextLong())
}
測定結果
[info] Running org.openjdk.jmh.Main -i 10 -wi 10 -f1 -t1 .*BitOperation.*

(snip)

[info] Benchmark                                          Mode  Samples         Score  Score error  Units
[info] c.g.m.m.u.b.BitOperationBench.ntzBinarySearch1    thrpt       10  35184555.294   147974.730  ops/s
[info] c.g.m.m.u.b.BitOperationBench.ntzBinarySearch2    thrpt       10  35130401.937   234705.330  ops/s
[info] c.g.m.m.u.b.BitOperationBench.ntzBinarySearch3    thrpt       10  29846819.149   352975.842  ops/s
[info] c.g.m.m.u.b.BitOperationBench.ntzHash             thrpt       10  35127105.013   127143.455  ops/s
[info] c.g.m.m.u.b.BitOperationBench.ntzJna              thrpt       10   1396115.477    16139.308  ops/s
[info] c.g.m.m.u.b.BitOperationBench.ntzJni              thrpt       10  25644475.628   231921.707  ops/s
[info] c.g.m.m.u.b.BitOperationBench.ntzLogarithm        thrpt       10  35144781.544    92927.496  ops/s
[info] c.g.m.m.u.b.BitOperationBench.ntzLoop1            thrpt       10  30099013.164   308642.730  ops/s
[info] c.g.m.m.u.b.BitOperationBench.ntzLoop2            thrpt       10  15183889.536   142090.869  ops/s
[info] c.g.m.m.u.b.BitOperationBench.ntzNaive            thrpt       10  14309678.759   317520.811  ops/s

飛び抜けて良いものがある、という訳ではなく
BinarySearch1, BinarySearch2, Logarithm, Hash が先頭グループとしてほぼ同等の成績。

JNI はやはり関数コールのペナルティが大きいのか、実用には厳しいレベル。
JNA は一つだけ桁違いに性能が悪かった。

やはり計測あるのみ。
"Trust no one, bench everything." を実感した。


References


Related Posts

10.05.2014

Micro Benchmark in Scala - Using sbt-jmh

Scala でマイクロベンチマーク - sbt-jmh を使ってみる


sbt-jmh は、sbt コンソールの中で、Java のマイクロベンチマークツールである jmh を扱えるようにする
sbt プラグインである。

Scala のマイクロベンチマークにデファクトスタンダードが存在するかどうかは分からないが、

といった経緯もあり、今回触れてみることにした。


環境
  • OS: Mac OS X 10.9.4
  • Scala: 2.11.2
  • sbt: 0.13.5
  • sbt-jmh: 0.1.6


sbt 定義ファイルの設定

まずは sbt の各種設定ファイルにプラグインの追加設定を行う。

  • plugins.sbt
    addSbtPlugin("pl.project13.scala" % "sbt-jmh" % "0.1.6")
  • build.sbt (利用時のみ)
    jmhSettings
  • Build.scala (利用時のみ/一例)
    import pl.project13.scala.sbt.SbtJmh._
    
    sbt.Project(...).settings(jmhSettings: _*)


ベンチマーク対象コードの記述

src/main/scala 配下の任意の .scala ファイルに適当なクラスを作って(objectではダメ)、
測定したいメソッドにアノテーション @org.openjdk.jmh.annotations.Benchmark を付けるだけでよい。

  • 例: 数値の Set/List を作成し、contains メソッドを実行するまでの所要時間を計測
    import org.openjdk.jmh.annotations.Benchmark
    
    class ContainsBench {
      @Benchmark
      def setContains(): Unit = (1 to 100000).toSet.contains(100001)
    
      @Benchmark
      def listContains(): Unit = (1 to 100000).toList.contains(100001)
    }
  • クラス内で状態を保持したり、パラメータ付きのメソッドを定義したい場合は
    @State など他のアノテーションの利用が必要
    import org.openjdk.jmh.annotations.{Benchmark, Scope, State}
    
    @State(Scope.Thread)
    class ContainsBench {
      val xs = (1 to 100000).toSet
      val ys = (1 to 100000).toList
    
      @Benchmark
      def setContains(): Unit = xs.contains(100001)
    
      @Benchmark
      def listContains(): Unit = ys.contains(100001)
    }


ベンチマークの実行

コードの準備が終わったら、sbt を起動。(マルチプロジェクトの場合は対象プロジェクトへ移動)

run -l でベンチマーク一覧、run -h でヘルプが表示される (オプションは非常に豊富)。

  • 全てのベンチマークの実行
    run -i 3 -wi 3 -f1 -t1

    -i でイテレーション回数、
    -wi でウォームアップイテレーション(測定前に実行される繰り返し)回数を指定。
    正確な測定を行うためには、それぞれ最低でも10〜20回を指定すべきとのこと。

    -f はフォークする数の指定。この回数だけウォームアップ+実測が繰り返される。
    -t はスレッド数。とりあえずは 1 を指定すれば良さそうだ。

    また、いくつかの測定モードが用意されているが、デフォルトではスループット計測モードとなる。
  • 特定のベンチマークの実行
    公式ドキュメントに載っていた例。ワイルドカードを使えるようだ。
    run -i 3 -wi 3 -f1 -t1 .*FalseSharing.*
  • 実行結果の例
    [info] Running org.openjdk.jmh.Main -i 3 -wi 3 -f1 -t1
    [info] # VM invoker: /Library/Java/JavaVirtualMachines/1.7.0.jdk/Contents/Home/jre/bin/java
    [info] # VM options: <none>
    [info] # Warmup: 3 iterations, 1 s each
    [info] # Measurement: 3 iterations, 1 s each
    [info] # Timeout: 10 min per iteration
    [info] # Threads: 1 thread, will synchronize iterations
    [info] # Benchmark mode: Throughput, ops/time
    [info] # Benchmark: com.github.mogproject.util.ContainsBench.listContains
    [info]
    [info] # Run progress: 0.00% complete, ETA 00:00:12
    [info] # Fork: 1 of 1
    [info] # Warmup Iteration   1: 35.322 ops/s
    [info] # Warmup Iteration   2: 40.904 ops/s
    [info] # Warmup Iteration   3: 46.665 ops/s
    [info] Iteration   1: 39.450 ops/s
    [info] Iteration   2: 42.116 ops/s
    [info] Iteration   3: 41.535 ops/s
    [info]
    [info]
    [info] Result: 41.033 ±(99.9%) 25.573 ops/s [Average]
    [info]   Statistics: (min, avg, max) = (39.450, 41.033, 42.116), stdev = 1.402
    [info]   Confidence interval (99.9%): [15.461, 66.606]
    [info]
    [info]
    [info] # VM invoker: /Library/Java/JavaVirtualMachines/1.7.0.jdk/Contents/Home/jre/bin/java
    [info] # VM options: <none>
    [info] # Warmup: 3 iterations, 1 s each
    [info] # Measurement: 3 iterations, 1 s each
    [info] # Timeout: 10 min per iteration
    [info] # Threads: 1 thread, will synchronize iterations
    [info] # Benchmark mode: Throughput, ops/time
    [info] # Benchmark: com.github.mogproject.util.ContainsBench.setContains
    [info]
    [info] # Run progress: 50.00% complete, ETA 00:00:07
    [info] # Fork: 1 of 1
    [info] # Warmup Iteration   1: 4.550 ops/s
    [info] # Warmup Iteration   2: 6.826 ops/s
    [info] # Warmup Iteration   3: 6.980 ops/s
    [info] Iteration   1: 6.730 ops/s
    [info] Iteration   2: 6.901 ops/s
    [info] Iteration   3: 6.798 ops/s
    [info]
    [info]
    [info] Result: 6.810 ±(99.9%) 1.569 ops/s [Average]
    [info]   Statistics: (min, avg, max) = (6.730, 6.810, 6.901), stdev = 0.086
    [info]   Confidence interval (99.9%): [5.241, 8.380]
    [info]
    [info]
    [info] # Run complete. Total time: 00:00:15
    [info]
    [info] Benchmark                              Mode  Samples   Score  Score error  Units
    [info] c.g.m.u.ContainsBench.listContains    thrpt        3  41.033       25.573  ops/s
    [info] c.g.m.u.ContainsBench.setContains     thrpt        3   6.810        1.569  ops/s
    
    contains メソッド自体は Set のほうが圧倒的に速いものの、toSet のコストが大きいため List バージョンのほうが良いスループットが出ることがわかった。

より高度な使い方は公式ドキュメントや以下を参照。


References

10.01.2014

Scala: How to define initial commands of REPL in SBT

Scala: SBTのREPL起動時に自動で実行されるコマンドを定義する


sbt console (マルチプロジェクトの場合は sbt project_name/console)を実行すると
プロジェクトの実行環境が完全にセットアップされた状態で REPL が立ち上がる。

このとき sbt の Key である initialCommands を定義すれば、
その内容がREPL初期化時に自動的に実行されるようになる。

毎回手で打つと面倒な import 文や、ちょっと試すためのデータなどを定義すると非常に捗る。

initialCommands in console := "import your.package.name._"


参考: initialCommands を駆使した例

9.04.2014

Cogito ergo sum

常々思うこと。


この世界は、私の認識によって成り立っている。


私が認識できないもの、すなわち知覚できないもの、知識として得られない有象無象は

そこに存在していないことと何一つ変わらない。


私は、私の死後の世界を認識することはできない。

その時、私という自我が失われることを、知識として身につけているからだ。

したがって、私の死後の世界は、私にとって存在しないものである。


ゆえに、私が死ぬことはない。

永遠に生き続けねばならないのだ。


何処に矛盾があるだろうか。

9.02.2014

C++: How to Get Per-Core CPU Usage in Mac

C++: Mac環境でコア単位のCPU使用率を測定する


環境
  • OS X: 10.9


コード
#include <stdio.h>
#include <unistd.h>
#include <mach/mach_host.h>
#include <mach/processor_info.h>
#include <iostream>

using namespace std;

class CpuUsage {
 public:
  CpuUsage(int core): core_(core) {
    prev = updated_ticks_(core);
  }

  float get() {
    Ticks t = updated_ticks_(core_);
    unsigned long long int used = t.used() - prev.used();
    unsigned long long int total = t.total() - prev.total();
    prev = t;
    return (float)used / (float)total * 100.0f;
  }

 private:
  struct Ticks {
    unsigned long long int usertime;
    unsigned long long int nicetime;
    unsigned long long int systemtime;
    unsigned long long int idletime;

    unsigned long long int used() { return usertime + nicetime + systemtime; }
    unsigned long long int total() { return usertime + nicetime + systemtime + idletime; }
  } prev;

  int core_;

  Ticks updated_ticks_(int core) {
    unsigned int cpu_count;
    processor_cpu_load_info_t cpu_load;
    mach_msg_type_number_t cpu_msg_count;

    int rc =  host_processor_info(
      mach_host_self( ),
      PROCESSOR_CPU_LOAD_INFO,
      &cpu_count,
      (processor_info_array_t *) &cpu_load,
      &cpu_msg_count
    );
    if (rc != 0) {
      printf("Error: failed to scan processor info (rc=%d)\n", rc);
      exit(1);
    }

    if (core < 0 || cpu_count <= core) {
      printf("Error: invalid core number: %d\n", core);
      exit(1);
    }
    unsigned long long int usertime = cpu_load[core].cpu_ticks[CPU_STATE_USER];
    unsigned long long int nicetime = cpu_load[core].cpu_ticks[CPU_STATE_NICE];
    unsigned long long int systemtime = cpu_load[core].cpu_ticks[CPU_STATE_SYSTEM];
    unsigned long long int idletime = cpu_load[core].cpu_ticks[CPU_STATE_IDLE];

    Ticks t = {usertime, nicetime, systemtime, idletime};
    return t;
  }

};

int main() {
  CpuUsage a(0), b(1), c(2), d(3);
  sleep(1);
  printf("%6.2f, %6.2f, %6.2f, %6.2f\n", a.get(), b.get(), c.get(), d.get());
  sleep(1);
  printf("%6.2f, %6.2f, %6.2f, %6.2f\n", a.get(), b.get(), c.get(), d.get());
  sleep(1);
  printf("%6.2f, %6.2f, %6.2f, %6.2f\n", a.get(), b.get(), c.get(), d.get());
  return 0;
}

(need improvement)


実行例
 78.00,  72.73,  85.00,  72.00
 78.00,  57.00,  72.00,  56.57
 82.00,  83.00,  90.00,  88.00


References

8.17.2014

Scala: Tackling with sbt-assembly

Scala: sbt-assembly を使う

Scala プロジェクト全体の jar ファイルを作るツールは色々あるが
ここ最近は sbt-assembly がデファクトスタンダードの座を確立したという感が強い。

導入

  • project/assembly.sbt の作成

    README に従い、以下の内容をのファイルを project/assembly.sbt として保存する。

    addSbtPlugin("com.eed3si9n" % "sbt-assembly" % "0.11.2")
  • Build.scala の編集

    build.sbt ではなく project/Build.scala に sbt の設定を書く場合の例。
    インポート文を以下のように書き、Project の settings に assemblySettings を追加する。

    import sbt._
    import sbt.Keys._
    import sbtassembly.Plugin._
    import AssemblyKeys._
    
    object Build extends Build {
      lazy val buildSettings = Seq(
        organization := "your.organization",
        version := "0.1.0",
        scalaVersion := "2.11.2",
        scalacOptions ++= Seq(
          "-encoding", "utf-8",
          "-target:jvm-1.7",
          "-deprecation",
          "-unchecked",
          "-Xlint",
          "-feature"
        ),
        javacOptions ++= Seq(
          "-encoding", "utf-8",
          "-source", "1.7",
          "-target", "1.7"
        )
      )
    
      lazy val dependencySettings = Seq(
        resolvers ++= Seq(
          // your resolvers
        ),
        libraryDependencies ++= Seq(
          // your library dependencies
        )
      )
    
      // configure prompt to show current project
      override lazy val settings = super.settings :+ {
        shellPrompt := { s => s"${Project.extract(s).currentProject.id}> " }
      }
    
      lazy val root = Project(
        id = "projectname",
        base = file("."),
        settings = super.settings ++ buildSettings ++
          dependencySettings ++ assemblySettings
      )
    }

    プロンプト文字列を変える設定は、spray/Build.scala at master · spray/spray から拝借した。

実行

sbt プロンプトの中で assembly と打つだけ。

projectname> assembly

OS のシェルから実行する場合は

$ sbt assembly

target/scala-X.X/projectname-assembly-X.X.X.jar が作成される。

jar ファイルの実行例

$ java $JAVA_OPTIONS -jar target/scala-X.X/projectname-assembly-X.X.X.jar


コンフリクトの解決

sbt-assembly に限らないが、jar 作成にあたって大半の時間は「依存関係スパゲッティ」との格闘に奪われる。

application.conf

例えば、複数プロジェクトでそれぞれ別の application.conf を利用している場合、デフォルトでは以下のようなエラーが出る。

java.lang.RuntimeException: deduplicate: different file contents found in the following:
application.conf
application.conf
        at sbtassembly.Plugin$Assembly$.sbtassembly$Plugin$Assembly$$applyStrategy$1(Plugin.scala:253)
        at sbtassembly.Plugin$Assembly$$anonfun$15.apply(Plugin.scala:270)
        at sbtassembly.Plugin$Assembly$$anonfun$15.apply(Plugin.scala:267)

*snip*

[error] (projectname/*:assembly) deduplicate: different file contents found in the following:
[error] application.conf
[error] application.conf

この場合、適切な mergeStrategy を作りこむ必要がある。

例えば、以下のように。
MergeStrategy.concat を指定すれば、application.conf という名前のファイルはその内容が全て結合される。

  lazy val assemblyAdditionalSettings = Seq(
    mergeStrategy in assembly ~= { (old) => {
      case "application.conf" => MergeStrategy.concat
      case x => old(x)
    }
    }
  )

  lazy val root = Project(
    id = "projectname",
    base = file("."),
    settings = super.settings ++ buildSettings ++
      dependencySettings ++ assemblySettings ++ assemblyAdditionalSettings
  )

同様のファイルが複数あるなら、以下のように指定すればよい。

case "application.conf" | "settings.conf" => MergeStrategy.concat


slf4j + logback

例えば、libraryDependencies に以下のように記述すると、assembly 実行時に class ファイルのコンフリクトが発生する。

      "ch.qos.logback" % "logback-classic" % "1.1.2",
      "org.slf4j" % "slf4j-simple" % "1.7.7",
      "org.slf4j" % "slf4j-api" % "1.7.7",
      "org.slf4j" % "slf4j-ext" % "1.7.7",
[error] (projectname/*:assembly) deduplicate: different file contents found in the following:
[error] /Users/xxxxxx/.ivy2/cache/ch.qos.logback/logback-classic/jars/logback-classic-1.1.2.jar:org/slf4j/impl/StaticLoggerBinder.class
[error] /Users/xxxxxx/.ivy2/cache/org.slf4j/slf4j-simple/jars/slf4j-simple-1.7.7.jar:org/slf4j/impl/StaticLoggerBinder.class
  • そもそも、必要なライブラリは何かを確認

    上記の例の場合、そもそも logback-classic と slf4j-simple を両方使っているのが間違い。
    slf4j-simple の記述を消せばよい。 => 参考

  • 依存ライブラリの除外設定

    複数のライブラリが、バージョンの異なる同じライブラリに依存している場合、libraryDependencies に exclude を指定する。

    Exclude specific transitive deps
    libraryDependencies ++= Seq(
      ("org.apache.spark" %% "spark-core" % "0.8.0-incubating").
        exclude("org.mortbay.jetty", "servlet-api").
        exclude("commons-beanutils", "commons-beanutils-core").
        exclude("commons-collections", "commons-collections").
        exclude("commons-collections", "commons-collections").
        exclude("com.esotericsoftware.minlog", "minlog")
    )
  • それでもダメなら、mergeStrategy に手を付ける

    パスに対してパターンマッチを適用し、適切なマージ方法を設定。

    Merge Strategy

    mergeStrategy in assembly <
      {
        case PathList("javax", "servlet", xs @ _*)         => MergeStrategy.first
        case PathList(ps @ _*) if ps.last endsWith ".html" => MergeStrategy.first
        case "application.conf" => MergeStrategy.concat
        case "unwanted.txt"     => MergeStrategy.discard
        case x => old(x)
      }
    }


その他の便利設定

テスト中は assembly を無効に
test in assembly := {}
エントリポイントの指定

明示したほうが可読性が上がりそう。

mainClass in assembly := Some("your.app.Boot")
scala-library を含めない

jar ファイルをダイエットさせたい場合。

assemblyOption in assembly ~= { _.copy(includeScala = false) }

ただ scala-library.jar 自体は 6MB 程度しかないので、含めておいたとしてもそんなに気にならないと思う。

最終的にはこのような形になった。


import sbt._
import sbt.Keys._
import sbtassembly.Plugin._
import AssemblyKeys._
 
object Build extends Build {
  lazy val buildSettings = Seq(
    organization := "your.organization",
    version := "0.1.0",
    scalaVersion := "2.11.2",
    scalacOptions ++= Seq(
      "-encoding", "utf-8",
      "-target:jvm-1.7",
      "-deprecation",
      "-unchecked",
      "-Xlint",
      "-feature"
    ),
    javacOptions ++= Seq(
      "-encoding", "utf-8",
      "-source", "1.7",
      "-target", "1.7"
    )
  )
 
  lazy val dependencySettings = Seq(
    resolvers ++= Seq(
      // your resolvers
    ),
    libraryDependencies ++= Seq(
      // your library dependencies
    )
  )

  lazy val assemblyAdditionalSettings = Seq(
    test in assembly := {},
    mainClass in assembly := Some("your.app.Boot"),
    mergeStrategy in assembly ~= { (old) => {
      case "application.conf" => MergeStrategy.concat
      case x => old(x)
    }
    }
  )

  // configure prompt to show current project
  override lazy val settings = super.settings :+ {
    shellPrompt := { s => s"${Project.extract(s).currentProject.id}> " }
  }
 
  lazy val root = Project(
    id = "projectname",
    base = file("."),
    settings = super.settings ++ buildSettings ++
      dependencySettings ++ assemblySettings ++ assemblyAdditionalSettings
  )
}

8.12.2014

Top N Sorter in Scala

Scala: トップNソートの実装


比較可能な大きな集合 $M$ に対して上位 $N$ 件のソート結果を取得したい。

この局面では一般にヒープソートが有効なので、PriorityQueue を使ってみる。


import scala.collection.mutable.PriorityQueue

class TopNSorter[A](n: Int)(ord: Ordering[A]) {
  private[this] val data = PriorityQueue()(ord.reverse)

  def insert(item: A): Unit = {
    data += item
    if (data.size > n) data.dequeue
  }

  def result(): Seq[A] = data.dequeueAll.reverse
}

insert は $O(\log N)$ になるはず。(要素の追加は $O(\log N)$, サイズ取得と先頭要素へのアクセスは$O(1)$)
$M$ 件挿入すれば $O(M\log N)$。
result は $O(N)$ だが、$N$ が小さい前提なので問題ない。

scala> val x = new TopNSorter[Int](100)(Ordering.Int)
x: TopNSorter[Int] = TopNSorter@520f1862

scala> (1 to 10000000) foreach x.insert

scala> x.result
res1: Seq[Int] = Vector(10000000, 9999999, 9999998, 9999997, 9999996, 9999995, 9999994, 9999993, 9999992, 9999991, 9999990, 9999989, 9999988, 9999987, 9999986, 9999985, 9999984, 9999983, 9999982, 9999981, 9999980, 9999979, 9999978, 9999977, 9999976, 9999975, 9999974, 9999973, 9999972, 9999971, 9999970, 9999969, 9999968, 9999967, 9999966, 9999965, 9999964, 9999963, 9999962, 9999961, 9999960, 9999959, 9999958, 9999957, 9999956, 9999955, 9999954, 9999953, 9999952, 9999951, 9999950, 9999949, 9999948, 9999947, 9999946, 9999945, 9999944, 9999943, 9999942, 9999941, 9999940, 9999939, 9999938, 9999937, 9999936, 9999935, 9999934, 9999933, 9999932, 9999931, 9999930, 9999929, 9999928, 9999927, 9999926, 9999925, 9999924, 9999923, 9999922, 9999921, 9999920, 9999919, 9999918, 9999917, 9999916, 9999915...

単に

scala> (1 to 10000000).sorted.reverse.take(100)

とするよりはずっと速い。

もう少しスマートに書けそうなものだけど。。。

8.10.2014

IVA Reading: Chapter 02, Section 06 Exercises

IVA読書会 chap02-sect06 宿題


No.5

lex順序でS多項式を求める計算問題。

RECAP
$$S(f, g) = \frac{x^\gamma}{{\scriptstyle \text{LT}}(f)}\cdot f - \frac{x^\gamma}{{\scriptstyle \text{LT}}(g)}\cdot g$$
where $$x^\gamma = \text{LCM}({\scriptstyle \text{LM}}(f), {\scriptstyle \text{LM}}(g))$$

計算には PARI/GP を利用。
ただ Leading Term を返す関数が見つからなかったので、LM, LC を手で計算して与えた。

? spol(f, g, lm_f, lm_g, lc_f, lc_g) = lcm(lm_f, lm_g)/(lm_f * lc_f) * f - lcm(lm_f, lm_g)/(lm_g * lc_g) * g
%11 = (f,g,lm_f,lm_g,lc_f,lc_g)->lcm(lm_f,lm_g)/(lm_f*lc_f)*f-lcm(lm_f,lm_g)/(lm_g*lc_g)*g
? spol(4*x^2*z - 7*y^2, x*y*z^2 + 3*x*z^4, x^2*z, x*y*z^2, 4, 1)
%12 = -3*z^4*x^2 - 7/4*z*y^3
? spol(x^4*y - z^2, 3*x*z^2 - y, x^4*y, x*z^2, 1, 3)
%18 = 1/3*y^2*x^3 - z^4
? spol(x^7*y^2*z + 2*i*x*y*z, 2*x^7*y^2*z + 4, x^7*y^2*z, x^7*y^2*z, 1, 2)
%17 = 2*i*z*y*x - 2
? spol(x*y + z^3, z^2 - 3*z, x*y, z^2, 1, 1)
%15 = 3*z*y*x + z^5

a.
$ \begin {eqnarray*} S(4x^2z - 7y^2, xyz^2 + 3xz^4) &=& \frac{x^2yz^2}{4x^2z}\cdot (4x^2z - 7y^2) - \frac{x^2yz^2}{xyz^2}\cdot (xyz^2 + 3xz^4)\\ &=& \frac{1}{4}yz \cdot (4x^2z - 7y^2) - x \cdot (xyz^2 + 3xz^4) \\ &=& x^2yz^2 - \frac{7}{4}y^3z - x^2yz^2 - 3x^2z^4 \\ &=& -3x^2z^4-\frac{7}{4}y^3z \end {eqnarray*}$

以下、途中式は省略。

b.
$ S(x^4y - z^2, 3xz^2 - y) = \frac{1}{3}x^3y^2 - z^4$

c.
$ S(x^7y^2z + 2ixyz, 2x^7y^2z + 4) = 2ixyz - 2$

d.
$ S(xy+z^3, z^2-3z) = 3xyz + z^5$


No.11

左辺を変形

$$\begin {eqnarray*} S(x^\alpha f, x^\beta g) &=& \frac{\text{LCM}({\scriptstyle \text{LM}}(x^\alpha f), {\scriptstyle \text{LM}}(x^\beta g))}{{\scriptstyle \text{LT}}(x^\alpha f)}\cdot x^\alpha f - \frac{\text{LCM}({\scriptstyle \text{LM}}(x^\alpha f), {\scriptstyle \text{LM}}(x^\beta g))}{{\scriptstyle \text{LT}}(x^\beta g)}\cdot x^\beta g \\ &=& \frac{\text{LCM}(x^\alpha {\scriptstyle \text{LM}}(f), x^\beta {\scriptstyle \text{LM}}(g))}{x^\alpha {\scriptstyle \text{LT}}(f)}\cdot x^\alpha f - \frac{\text{LCM}(x^\alpha {\scriptstyle \text{LM}}(f), x^\beta {\scriptstyle \text{LM}}(g))}{x^\beta {\scriptstyle \text{LT}}(g)}\cdot x^\beta g \\ &=& \frac{\text{LCM}(x^\alpha {\scriptstyle \text{LM}}(f), x^\beta {\scriptstyle \text{LM}}(g))}{{\scriptstyle \text{LT}}(f)}\cdot f - \frac{\text{LCM}(x^\alpha {\scriptstyle \text{LM}}(f), x^\beta {\scriptstyle \text{LM}}(g))}{{\scriptstyle \text{LT}}(g)}\cdot g \end {eqnarray*} $$

右辺を変形

$$\begin {eqnarray*} x^\gamma S(f,g) &=& x^\gamma \cdot \Bigl(\frac{\text{LCM}({\scriptstyle \text{LM}}(f), {\scriptstyle \text{LM}}(g))}{{\scriptstyle \text{LT}}(f)}\cdot f - \frac{\text{LCM}({\scriptstyle \text{LM}}(f), {\scriptstyle \text{LM}}(g))}{{\scriptstyle \text{LT}}(g)}\cdot g\Bigr) \\ &=& \frac{\text{LCM}(x^\alpha {\scriptstyle \text{LM}}(f), x^\beta {\scriptstyle \text{LM}}(g))}{\text{LCM}({\scriptstyle \text{LM}}(f), {\scriptstyle \text{LM}}(g))} \cdot \Bigl(\frac{\text{LCM}({\scriptstyle \text{LM}}(f), {\scriptstyle \text{LM}}(g))}{{\scriptstyle \text{LT}}(f)}\cdot f - \frac{\text{LCM}({\scriptstyle \text{LM}}(f), {\scriptstyle \text{LM}}(g))}{{\scriptstyle \text{LT}}(g)}\cdot g\Bigr) \\ &=& \text{LCM}(x^\alpha {\scriptstyle \text{LM}}(f), x^\beta {\scriptstyle \text{LM}}(g)) \cdot \Bigl(\frac{1}{{\scriptstyle \text{LT}}(f)}\cdot f - \frac{1}{{\scriptstyle \text{LT}}(g)}\cdot g\Bigr) \\ &=& \frac{\text{LCM}(x^\alpha {\scriptstyle \text{LM}}(f), x^\beta {\scriptstyle \text{LM}}(g))}{{\scriptstyle \text{LT}}(f)}\cdot f - \frac{\text{LCM}(x^\alpha {\scriptstyle \text{LM}}(f), x^\beta {\scriptstyle \text{LM}}(g))}{{\scriptstyle \text{LT}}(g)}\cdot g \end {eqnarray*} $$

したがって、$S(x^\alpha f, x^\beta g) = x^\gamma S(f,g)$


また、
$\text{LCM}(x^\alpha {\scriptstyle \text{LM}}(f), x^\beta {\scriptstyle \text{LM}}(g)) = \text{LCM}({\scriptstyle \text{LM}}(x^\alpha f), {\scriptstyle \text{LM}}(x^\beta g))$
${\scriptstyle \text{LM}}(f) \mid {\scriptstyle \text{LM}}(x^\alpha f)$
${\scriptstyle \text{LM}}(g) \mid {\scriptstyle \text{LM}}(x^\alpha g)$
より、
$\text{LCM}({\scriptstyle \text{LM}}(f), {\scriptstyle \text{LM}}(g)) \mid \text{LCM}(x^\alpha {\scriptstyle \text{LM}}(f), x^\beta {\scriptstyle \text{LM}}(g))$

$x^\alpha$, $x^\beta$, ${\scriptstyle \text{LM}}(f)$, ${\scriptstyle \text{LM}}(g)$ はいずれも単項式であるから、$x^\gamma$ もまた単項式である。

8.07.2014

How to Make a Transpose of 2D-Array in Scala

Scala: 2次元配列を転置する方法


要素数 $M \times N$ の 2次元配列 $A$ に対して、$A_{ij} = B_{ji} \, (1 \le i \le M,\, 1 \le j \le N)$ となるような
$N \times M$ の2次元配列 $B=A^T$ を作成したい。

Scala の Array クラスには、そのものズバリ transpose というメソッドがある。

scala> val a = Array(Array(1,2,3),Array(4,5,6),Array(7,8,9),Array(10,11,12))
a: Array[Array[Int]] = Array(Array(1, 2, 3), Array(4, 5, 6), Array(7, 8, 9), Array(10, 11, 12))

scala> a.transpose
res0: Array[Array[Int]] = Array(Array(1, 4, 7, 10), Array(2, 5, 8, 11), Array(3, 6, 9, 12))

これを利用すれば、文字列を区切って縦に結合するような処理もシンプルに記述できる。

scala> val s = """
     | abc 123
     | def 456
     | """
s: String =
"
abc 123
def 456
"

scala> s.split('\n').withFilter(!_.isEmpty).map(_.split("[ ]+")).transpose map (_.mkString)
res1: Array[String] = Array(abcdef, 123456)


References

7.30.2014

Scala: How to Merge Two Maps with Summing Values

Scala: Map の値を加算しながらマージする


Scalaz を使うとシンプル。

sbt 設定例

libraryDependencies += "org.scalaz" %% "scalaz-core" % "7.0.6"

実行例

scala> import scalaz.Scalaz._
import scalaz.Scalaz._

scala> Map('a -> 10, 'b -> 20, 'c -> 30) |+| Map('a -> 5, 'c -> 7, 'd -> 9)
res0: scala.collection.immutable.Map[Symbol,Int] = Map('a -> 15, 'c -> 37, 'd -> 9, 'b -> 20)

引き算をするなら、こんな感じだろうか。

scala> Map('a -> 10, 'b -> 20, 'c -> 30) |+| Map('a -> 5, 'c -> 7, 'd -> 9).mapValues(-_)
res1: scala.collection.immutable.Map[Symbol,Int] = Map('a -> 5, 'c -> 23, 'd -> -9, 'b -> 20)


References

7.21.2014

Scala: Getting Started with Akka-HTTP

Scala: Akka-HTTP を試してみる


Akka-HTTP とは、Spray++ という位置づけの新進気鋭の HTTPサーバ フレームワーク。
Reactive Stream を使って実装されているのが大きな特徴。

Spray は ベンチマークFinaglewai (Haskell) に圧勝している。
Akka-HTTP もその流れを引き継ぎ、ハイパフォーマンスサーバに適したフレームワークになるだろうと期待している。

これまで Spray すら使ったことがなかったのだが、少しだけ Akka-HTTP に触れてみる。


Hello World with Akka-HTTP


/ping にアクセスすると "PONG" を返すシンプルな Webサーバを作る。

project/Build.scala
import sbt._
import sbt.Keys._

object ApplicationBuild extends Build {
  lazy val buildSettings = Seq(
    organization := "com.github.mogproject",
    version      := "0.1.0-SNAPSHOT",
    scalaVersion := "2.11.1",
    scalacOptions ++= Seq(
      "-deprecation",
      "-unchecked",
      "-feature",
      "-encoding", "utf-8"
    ),
    javacOptions ++= Seq(
      "-source", "1.7"
    )
  )

  lazy val resolverSettings = Seq(
    resolvers ++= Seq(
      "Sonatype OSS Releases" at "http://oss.sonatype.org/content/repositories/releases",
      "Sonatype OSS Snapshots" at "http://oss.sonatype.org/content/repositories/snapshots",
      "Typesafe Repository" at "http://repo.typesafe.com/typesafe/releases/"
    ),
    libraryDependencies ++= Seq(
      "org.scalatest" %% "scalatest" % "2.2.0" % "test",
      "com.typesafe" % "config" % "1.2.1",
      "com.typesafe.akka" %% "akka-http-core-experimental" % "0.4",
      "com.typesafe.akka" %% "akka-stream-experimental" % "0.4"
    )
  )

  lazy val testSettings = Seq(
    parallelExecution in Test := true
  )

  lazy val root = Project(
    id = "akka-http-example",
    base = file("."),
    settings = super.settings ++ buildSettings ++ resolverSettings ++ testSettings
  )
}
src/main/resources/application.conf
akka {
  loglevel = INFO
}
src/main/scala/Boot.scala
import akka.io.IO
import akka.http.Http

import akka.actor.ActorSystem
import akka.pattern.ask
import akka.util.Timeout
import akka.http.model._
import akka.http.model.HttpMethods._
import scala.concurrent.duration._
import akka.stream.scaladsl.Flow

object Boot extends App {
  import system.dispatcher
  implicit val system = ActorSystem()
  implicit val askTimeout: Timeout = 500.millis

  val bindingFuture = IO(Http) ? Http.Bind("localhost", 8080)

  bindingFuture foreach { binding =>
    Flow(binding.connectionStream) foreach { connection =>
      Flow(connection.requestProducer).map {
        case HttpRequest(GET, Uri.Path("/ping"), _, _, _) =>
          HttpResponse(entity = "PONG!")
        case _ => HttpResponse(404, entity = "Unknown resource!")
      }.produceTo(connection.responseOut)
    }
  }
}
[error] akka-http-example/src/main/scala/Boot.scala:20: value connectionStream is not a member of Any
[error]     Flow(binding.connectionStream) foreach { connection ⇒
[error]                  ^
[error] one error found
[error] (compile:compile) Compilation failed
  • 以下のように修正したら、動いた
import akka.io.IO
import akka.http.Http

import akka.actor.ActorSystem
import akka.pattern.ask
import akka.util.Timeout
import akka.stream.{MaterializerSettings, FlowMaterializer}
import akka.http.model._
import akka.http.model.HttpMethods._
import scala.concurrent.duration._
import akka.stream.scaladsl.Flow

object Boot extends App {
  import system.dispatcher
  implicit val system = ActorSystem()
  implicit val askTimeout: Timeout = 500.millis

  val materializer = FlowMaterializer(MaterializerSettings())
  val bindingFuture = IO(Http) ? Http.Bind("localhost", 8080)

  bindingFuture foreach { case Http.ServerBinding(localAddress, connectionStream) =>
    Flow(connectionStream).foreach { case Http.IncomingConnection(remoteAddress, requestProducer, responseConsumer) =>
      Flow(requestProducer).map {
        case HttpRequest(GET, Uri.Path("/ping"), _, _, _) =>
          HttpResponse(entity = "PONG!")
        case _ => HttpResponse(404, entity = "Unknown resource!")
      }.produceTo(materializer, responseConsumer)
    }.consume(materializer)
  }
}
$ curl http://localhost:8080/ping
PONG!
$ curl http://localhost:8080/pin
Unknown resource!


ルーティング

ロードマップによると、spray-routing に相当する DSLライブラリが akka-http (akka-http-core ではない) に組み込まれる予定とのこと。

現時点ではまだ無いのでパターンマッチで何とかするしかなさそう。

  • 公式ドキュメントにかかれていたサンプル
import HttpMethods._

val requestHandler: HttpRequest ⇒ HttpResponse = {
  case HttpRequest(GET, Uri.Path("/"), _, _, _) ⇒
    HttpResponse(
      entity = HttpEntity(MediaTypes.`text/html`,
        "<html><body>Hello world!</body></html>"))

  case HttpRequest(GET, Uri.Path("/ping"), _, _, _) ⇒ HttpResponse(entity = "PONG!")
  case HttpRequest(GET, Uri.Path("/crash"), _, _, _) ⇒ sys.error("BOOM!")
  case _: HttpRequest ⇒ HttpResponse(404, entity = "Unknown resource!")
}


References